Server side requirements for Communicator GO 5.2
GloCOM GO 5.2 is the next step in the evolution of our mobile application and in combination with PBXware 5 it provides new features and offers more freedom and flexibility to users than its predecessor.
- PBXware has to be version 5.0 at least
- Format of voice messages has to be wav.
- SSL/TLS certificate must support SHA2.
OPUS
Opus is audio coding format designed to efficiently code speech and general audio in a single format and to handle a wide range of interactive audio applications, while remaining low-latency enough for real-time interactive communication.
It is distinguished from most high quality formats by having low delay and by supporting high audio quality.
-
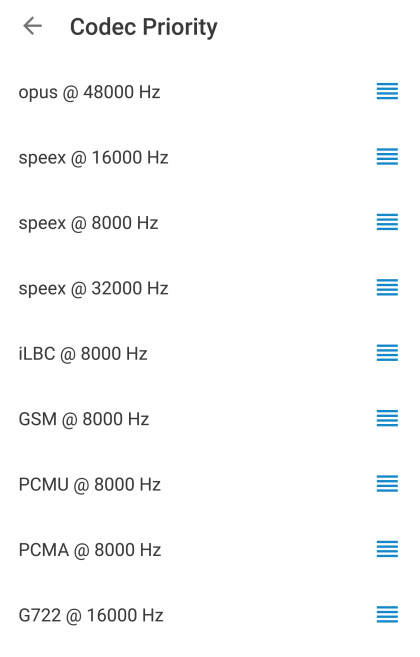
OPUS
Opus is fully supported for Android users with at least Android 6.0 installed in order for the Opus codec to be compatible with Communicator GO 5.2.
Push Notifications
One of the features our users were waiting in anticipation are Communicator GO push notifications.
PBXware 5 is now running Push Notifications Service that will forward requests to our hosted Push Notifications Platform. Once push request is forwarded from PBXware, the platform will propagate push notifications to devices using Communicator GO.
-
Push notifications disabled
This feature is adding more convenience to users connectivity when they are on a business trip, working from home or simply need to answer business calls when they are outside the office.
With push notifications, mobile app does not have to be registered via SIP all the time in order to receive incoming calls or notifications. This will make sure your Communicator GO will not lose connectivity when app runs in the background and it will save battery life of your mobile device, improving overall user experience.
Although users should only benefit from the way push notifications affect the app we have still left to users to decide whether they would like to use push notifications or not.
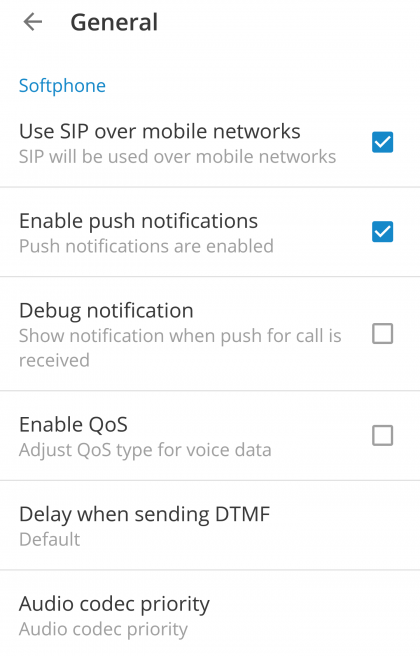
In case you would like to disable Push Notifications click Menu icon in Communicator contacts window and when slider opens click Settings. Once you are in Settings menu, click General and once in the menu remove checkmark from Enable push notifications checkbox.
On Android, push notifications are stopped when you use Quit option to terminate the app.
Also, push notifications are stopped if you click on FORCE STOP button on your device (Settings -> Apps -> Communicator GO).
NOTE: Because of the way push notifications work, Communicator GO will not be registered once app goes to the background and as such, it might not be displayed as Online in PBXware Monitor page.
Automatic Updates
gloCOM GO 5.2 also brings up a new update mechanism. In previous versions users would have to manually check App or Play store to see if new version is available. This is no longer the case as Communicator GO will notify users once new version is available for download.
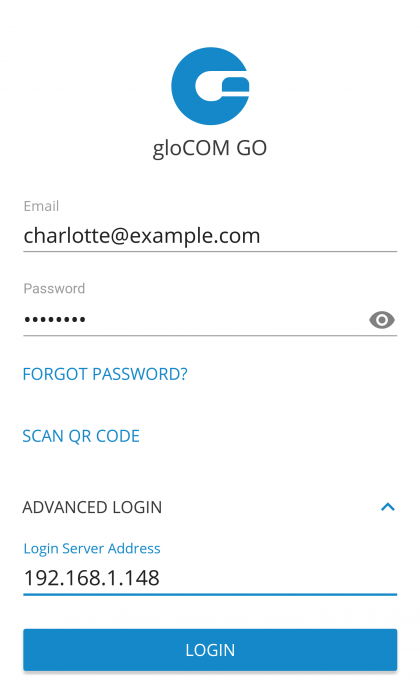
Logging in
gloCOM GO requires email address and password for login. Additionally, server address may be needed if cannot be resolved through DNS record based on the email address.
In case you have your own DNS server, by adding DNS SRV record for your e-mail domain, mobile and desktop clients will make Communicator GO login much easier for end users as they will only have to provide their e-mail address and User password associated with their PBXware extension and click Log In.
If you are unable to set DNS SRV or if DNS resolution fails you will receive notification DNS resolution failed and users will have to click ADVANCED and enter PBXware IP address when logging in with their Communicator GO client.
DNS SRV record that needs to be configured to point to PBXware is:
_pwproxy._tcp.domain. 86400 IN SRV 0 5 10005 pbxserver.domain.
For more information on DNS SRV please check wikipedia link: http://en.wikipedia.org/wiki/SRV_record
NOTE: In order for this feature to work, all e-mail addresses used must use your company domain (i.e. bicomsystems.com).
- Enter email address associated with your extension. This is used as username for Communicator GO login.
- Password
- To authenticate Communicator GO with your PBXware server you will also need to provide user password generated on your extension.
- ADVANCED
- This button will display additional entry field named Login Server Address that will allow you to enter the address of PBXware you would like to register to. This is necessary in scenarios where DNS SRV record is not available and PBXware address cannot be resolved automatically.
- Login Server Address
- This field is shown only if ADVANCED button is pressed, and allows you to enter the address of PBXware you would like to register to. In case DNS SRV record is set up (as previously explained) this field does not have to be populated.
- SCAN QR CODE
- This button opens a camera preview for QR code scanning.
- FORGOT PASSWORD
- By clicking this button you will open a confirmation dialog for password resetting. Email and optionally server address fields need to be filled out before attempting password reset.
Logging in using QR code
It is possible to login in Communicator GO using specially created QR code. This is often used and helpful when you log in with Communicator GO for the first time.
When administrator creates your extension, you will be assigned a long, automatically generated user password on your email and typing it into Communicator GO can be error prone. With this feature you can simply scan the QR code attached in the extensions credentials email, by pressing SCAN QR CODE button and pointing your phone camera to the monitor. Once QR code image is detected Communicator GO will fill out all the fields necessary for login.
NOTE: Before you are able to use this feature PBXware Administrator must make some settings changes on PBXware, otherwise Address (hostname) field will be empty and users will not be able to register their clients.
Login to your PBXware GUI and navigate to
Settings -> Servers/Tenants and edit Server/Master tenant
Click Show Advanced Options and once you do that, you will be able to see QR Code Server option. This field must be populated with servers IP address or domain name.
Once entered, save changes and QR Code login should be ready for use.
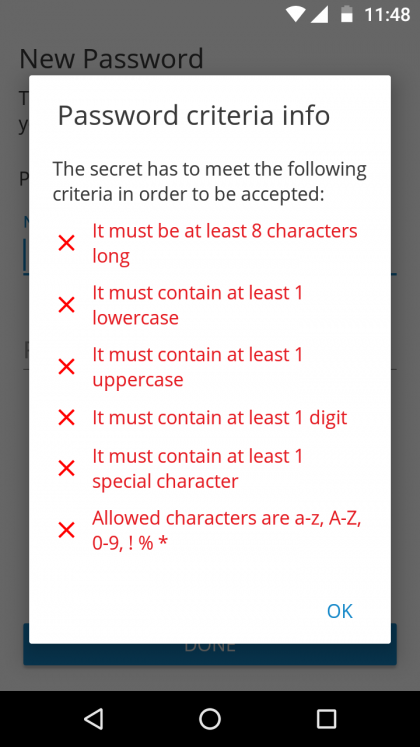
Setting new password after logging in for the first time
When you log in Communicator GO for the first time, you will be asked to change your password. You will have to enter new password and retype it in order to confirm it. In case you make a mistake so password entries do not match or in case password is not strong enough, NEXT button will stay disabled. Once your password match our strength criteria you will be able to log in.
Location and Phone settings
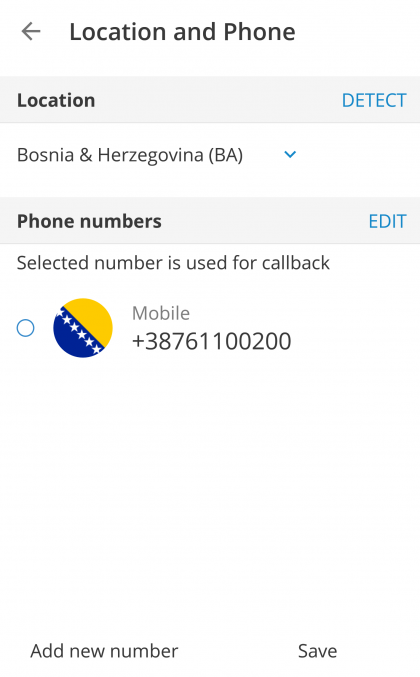
- Location
Clicking on country name opens screen with countries to choose from.
- DETECT
- DETECT button tries to detect your country automatically. This works if you have Location Services enabled in your system’s settings. Information about your country is needed if you need to use E.164 numbers format when dialing phone numbers from your phone book.
- PHONE NUMBERS
- This section contain numbers defined with your extension. You can add more numbers using ADD NEW NUMBER button and sort them by priority using the drag handle on the right of number and label. These numbers appear in a list of numbers associated with your extension when someone tries to call you from Communicator GO or desktop gloCOM.
Optimization for large contacts directories’
Loading for large phonebooks now works faster than ever so Communicator GO users are not inconvenienced when having lots of numbers to load.
NOTE: Feature available in Communicator GO 5.2.1
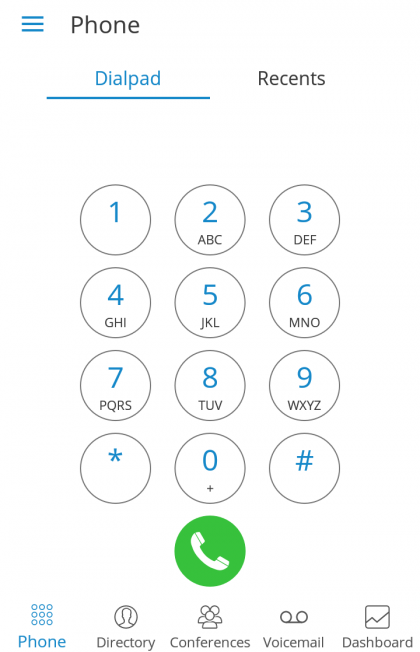
Phone
Default dialer screen is displayed once Communicator GO 5.2 is started.
Call button in dialer screen has three states depending on softphone registration status and connectivity status.
If softphone is not registered and button is yellow, calls still can be made if callback option is configured.
There are three states Communicator GO dialer can be in:
- Green – Call can be made over SIP protocol (WiFi and Mobile Data Networks)
- Yellow – Call can be made with Callback module (Mobile Data Networks)
- Gray – Call can not be made (No Network Connections)
Editable dial number
The entered number inside the dialer of the Communicator GO Android can now be modified before placing a call.
NOTE: Feature available in Communicator GO 5.2.1
Call
In Communicator GO, calls can be made over SIP protocol, which is a primary option or using Callback module in pwproxy.
Call scenarios may vary and will depend on network connection (WiFi, Mobile Data, No Connection), service availability and connections (SIP Server, Callback Module) and setup in settings for “SIP over mobile internet”
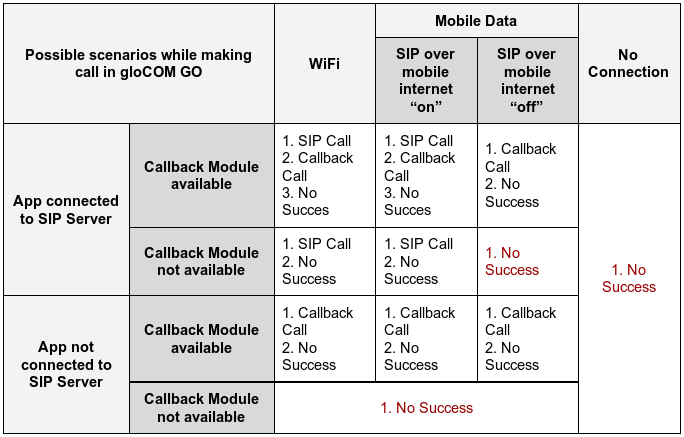
Table above displays the order in which Communicator GO will try to establish call in different scenarios.
If we for example take an first scenario for WiFi where order is:
- SIP Call
- Callback Call
- No Success
This means that in scenario where device is connected through the WiFi, app is connected to the SIP Server and Callback Module is available on PBXWare, Communicator GO will first try to make a SIP Call, if unsuccessful, it will then try to make a call using Callback and if this fails it will display the message that call was not made.
Favorites
You can add other users and contacts from phone book to favorites to have them in one place and have them show up first while performing an action, e.g. transferring a call.
Users can be added/removed from favorites by clicking Add to favorites or Remove from favorites on user’s details screen as shown in the pictures below.
-
>
Favorites screen
Contacts from phone book can also be added or removed from your favorites by clicking on it and choosing Add to favorites or Remove from favorites.
Favorites screen appears when user clicks Favorites Tab from Header Bar in Phone Screen.
When this screen is shown, if there is no favorites, “No Favorites” label should be displayed in the middle of the screen. By default, favorites are displayed in Grid mode and sorted by name in ascendingorder.
Clicking on the favorite that is a Communicator GO contact (extension) will display extension options screen and if favorite contact is a contact from your device’s phonebook Contact’s Screen will be shown.
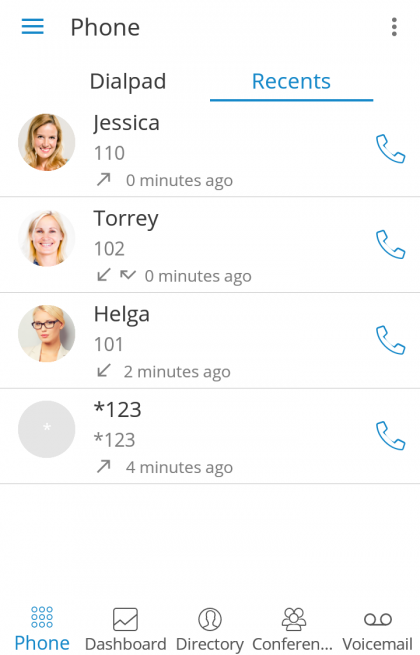
Recents
This screens will be displayed when user press Recents Tab from Header Bar in Phone Screen and list of the recent calls will be displayed.
In case there is no recent calls, “No Recents” label should be displayed in the middle of the screen.
Recent calls are displayed in list mode and sorted descending by the date/time.
Clicking the favorite which is a Communicator GO contact (extension) will display extension options screen and if favorite contact is a contact from your device’s phonebook Contact’s Screen will be shown.
gloCOM contacts
First screen you will see when Communicator GO is launched will show list of users from your organization. Users can be sorted according to presence and department in ascending and descending order.
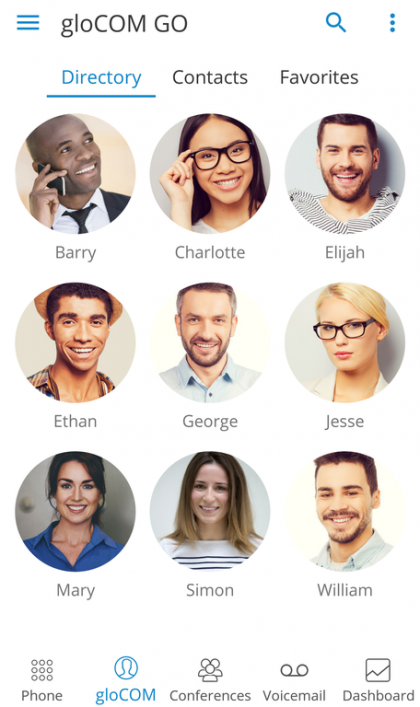
Clicking on a user will open up user’s details screen from which you are able to see user information and perform different actions.
In case user associated additional phone numbers with their extension, these numbers will be listed as well and you will be able to dial them by simply pressing the number.
gloCOM Contacts Search
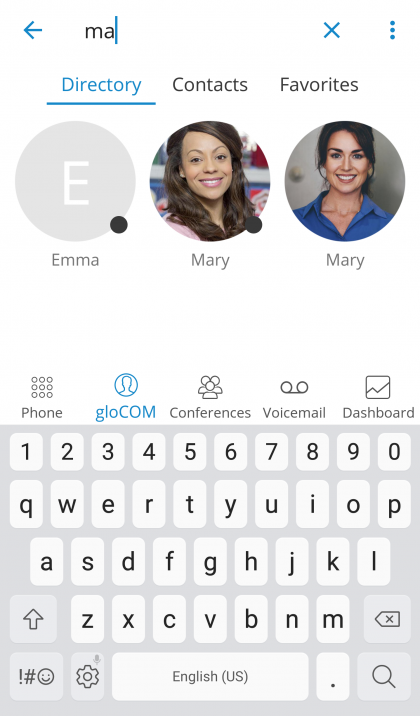
To search Communicator contacts click on the search icon in the upper right corner and search entry field will be displayed. Click in the search field and enter the name of contact you would like to find.
As you start entering search pattern (contact name or extension number) list of Communicator contacts will be filtered based on the pattern you enter. Once your contact is visible on the screen click on it and you will be taken into Communicator contact screen. From here you will be able to call this contact or perform other actions.
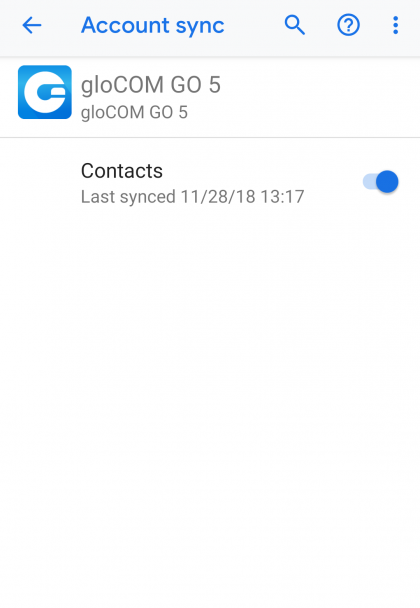
gloCOM Contacts Integration
gloCOM Contacts Integration is new feature in Communicator GO 5.2.
Contacts should sync automatically, but if you are having issues it is best to sync these feature manually.
The user needs to have contacts synced under phone’s Settings > Accounts > Sync.
Extensions Departments

This screen appears when you press Menu icon in the upper right corner of the Communicator Contacts screen and once Menu screen is opened Departments selection will be available as a first option on the list. By default, “All” is selected for departments so all the users are available on the list, however, in case you need to filter users by specific department, you must click All to see a list of all available departments.
To filter users by specific department, click on preferred department in the list. Once department is selected you should only see Communicator users that are members of that department.
In case you would like to restore default view for all departments simply repeat the process and instead of specific department select All from the list.
SIP Call
SIP Call Screen appears when user initiate or receive a call through PBXware. With CallKit integration introduced in Communicator GO 5.2 iOS, options on connected call are similar to options available in native iOS dialer app.
-
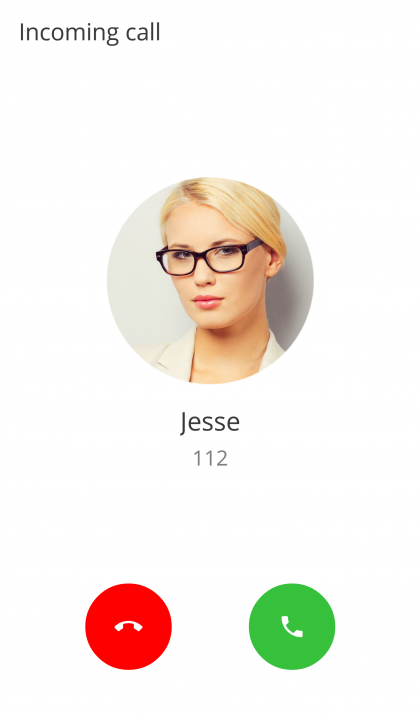
Incoming SIP Call
-
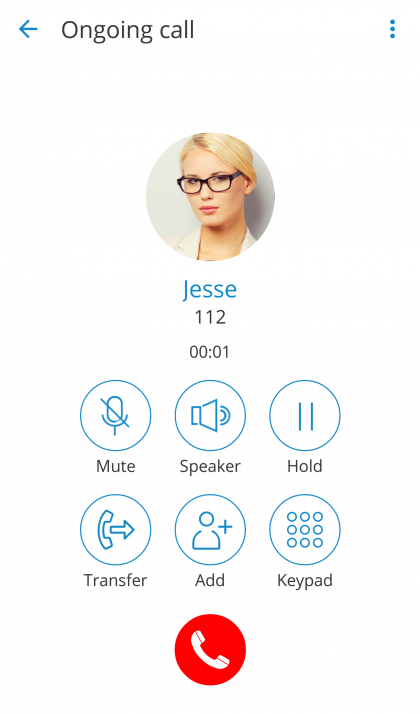
Answered SIP Call
Once call is connected Communicator GO allows you to perform several actions:
- Mute
- Mute allows you to disable the microphone on your device, preventing any unwanted communication on your side to be transmitted to other side of the call.
- Speaker
- Press Speaker button if you would like to put your device in speakerphone mode, allowing you to continue the without holding the device on your ear, or to allow other persons in the room to join the conversation through a single device.
- Hold
- Hold option will put caller on hold and play Music on Hold until Hold is pressed again or call is transferred to another destination.
- Transfer
- Transfer button allows you to initiate blind or attended transfer to PBXware extension or outbound number.
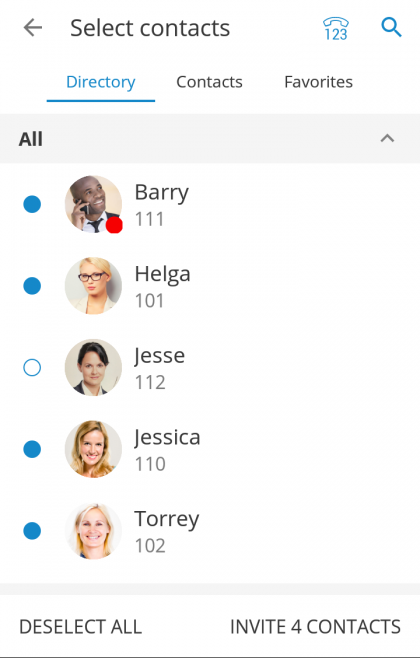
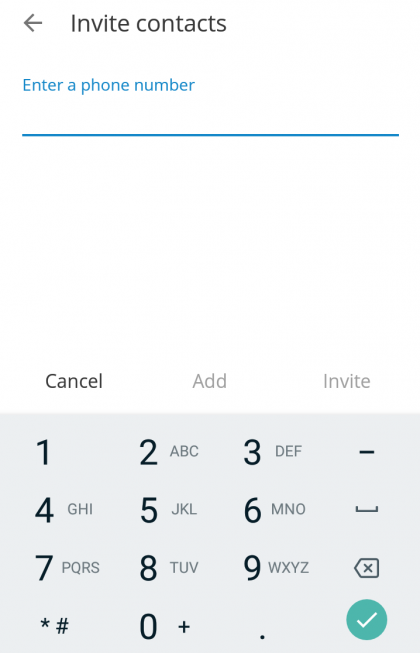
- Invite
- Invite option allows you to create Instant conference by adding one or more people to ongoing call. With this option you can add PBXware extensions or any number available from your contact list.
- Dialpad
- Use the Dialpad to enter the phone number you want to dial. Click on the Dial icon to place a call.
Multiple SIP Calls
-

Outgoing SIP Call
gloCOM GO offers an option to handle two calls at the same time.
This means, if there is one SIP call in progress and you receive another call, it will be presented to user on the SIP Call Screen.If answered, Communicator GO will set one call on hold.
gloCOM will exit from Multiple SIP Calls state if one of the calls is finished.
Call transfer
You can transfer a call by clicking transfer icon from call options menu. Popup dialog shows with transfer options.
If you press Blind transfer you will be able to transfer your call to three destinations:
- To all my devices
- Pressing To all my devices will transfer a call to all devices that are registered with your extension. They all ring and you can continue call on any of them by answering the call. This can be particularly useful in situations where you need to leave the office but would like to continue ongoing call on your mobile device.
- To contact…
- Pressing To contact… brings up a screen with favorites, users and phone book contacts to choose someone to transfer call to.
- Enter number…
- When pressed, this option will display popup dialog with number entry field for number to transfer call to.
Supervised transfer only allow you to select between To contact and Enter number options.
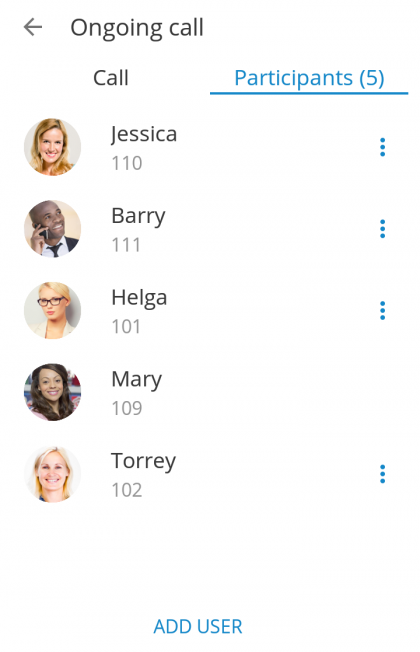
Conference calls
Beside the ability to handle multiple calls, Communicator GO also allow you to join two calls into Instant conference. In addition to this, users can join predefined conference rooms and add other participants same as on Communicator desktop app.
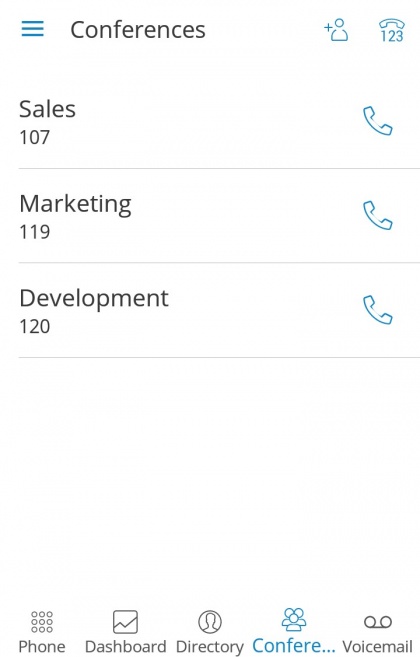
Selecting a conference will display a list of participants and “JOIN” button at the bottom, which allows you to join selected conference.
List of participants is updated in real time as users join or leave the conference room.
When flagged as conference Admin, user will also have option to Mute or Kick conference participants.
Voicemail management
With Communicator GO you can listen to new and archived voice messages, archive and delete one or many messages. You can also call other users’ voicemail directly.
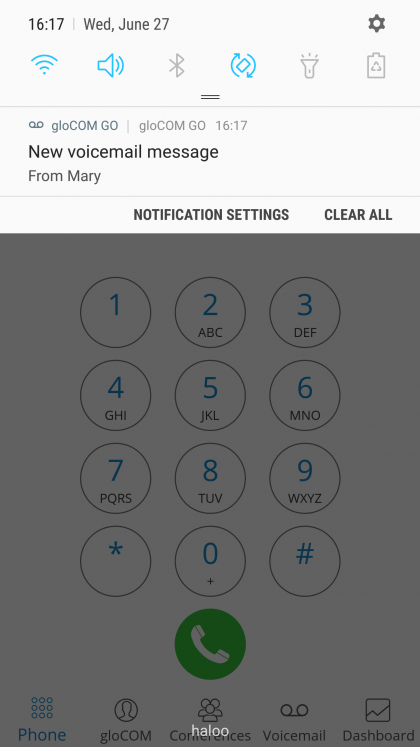
Notifications are shown for new voice messages as shown below.
Playing voice messages
Messages can be played by opening the message itself and then playing it or by played in preview mode by clicking play button from the messages list.
If the message is not downloaded when play is clicked, progress dialog will be shown and once download is done message should start playing.
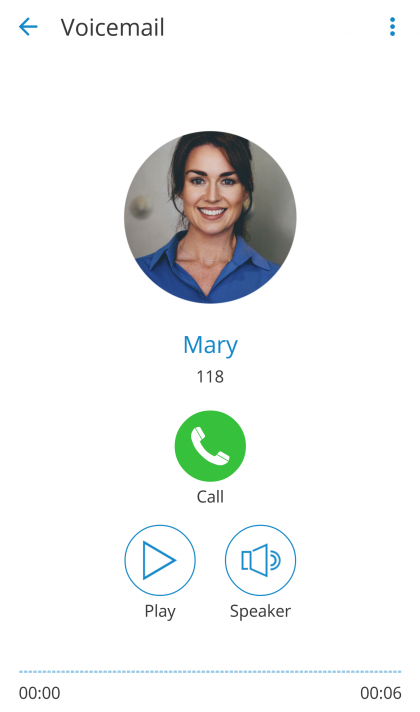
When playing messages in separate screen you can swipe left or right to switch between messages.
Deleting and archiving voice messages
You can delete or archive individual messages by clicking on them and then clicking delete icon () or archive icon () in toolbar.
You can also select more messages and delete or archive them together by long clicking a message from the list and then clicking delete icon or archive icon in toolbar.
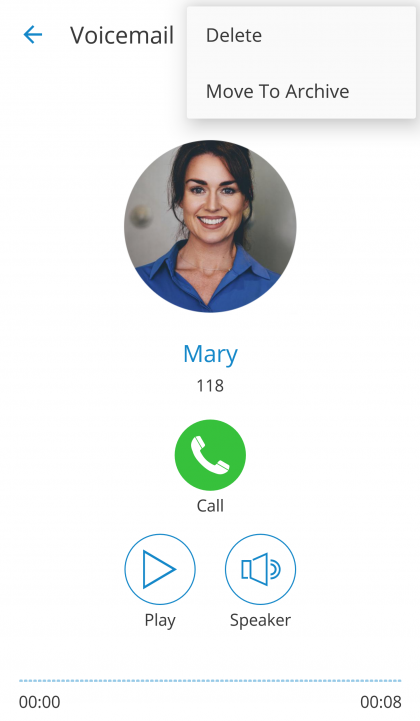
- – Select all icon () selects/de-selects all messages in the list.
- – Delete icon deletes selected messages.
- – Archive icon archives selected messages.
Calling other voicemail boxes directly
In case you would like to leave a voicemail directly, dial *125EXT_No where EXT_No is extension number of a contact, alternatively or you could open user’s details screen and click Call voicemail as shown below.
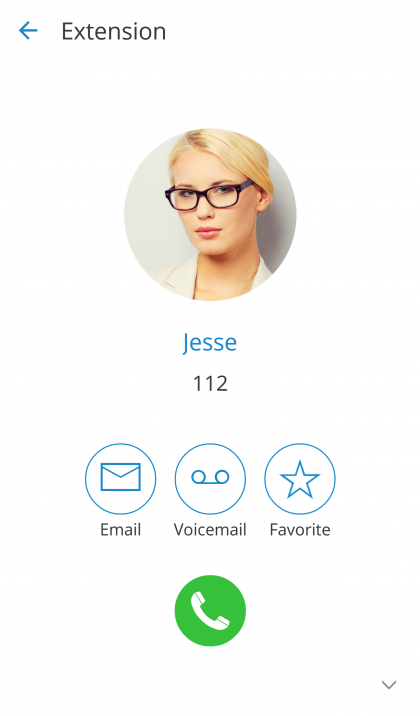
Click Call Voicemail to leave a voicemail message to contact.
Using callback feature
Callback is useful when softphone cannot be registered due to some error, or when poor network quality impacts call quality.
Simply, when using callback, Communicator GO tells server to call your mobile number via regular GSM network and you will receive a GSM call.
When starting Communicator GO for the first time you will see tip about callback as below.
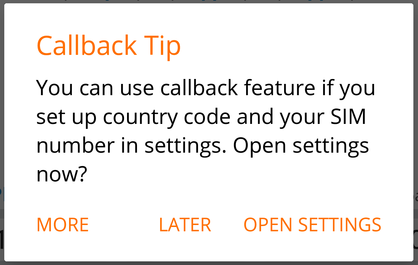
- MORE
- By pressing this button additional information about callback functionality will be displayed.
- LATER
- Press this button to dismiss Callback Tip dialog.
- OPEN SETTINGS
- OPEN SETTINGS button opens Location and Phone settings screen.
When callback settings are in place you have option to use callback for all outgoing calls in Settings -> General -> Callback usage.
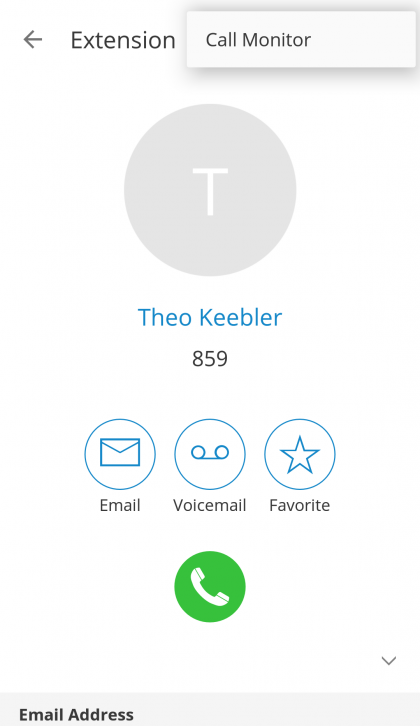
Call monitor
When call monitoring is enabled in the ES on the extension, users will see a 3 dots menu inside the extension profile and when pressed, the call monitoring feature will be available. If you don’t have call monitoring enabled on the extension, you will not be able to see that option.
Dashboard
gloCOM GO dashboard incorporates call information and easy control of Enhanced Services.
Dashboard can be started from the drawer menu and will present you with latest call information. Call related data like total calls, number of answered calls, talk time and Billing information will be displayed in the dashboard.
In addition, user will be able to see voicemail status and number of voicemail messages. On top of that, users will now be able to see current status of enhanced services as well as be able to enable or disable them. Users are now able to control Call Forwarding, Do Not Disturb and Block Caller ID services. In case one or more of these enhanced services are not visible in Communicator GO Dashboard, PBXware Administrator did not enable user to control them.
In case more than one device is registered to particular extension Registered Devices section will display information about all connected device including User Agent, IP address and Country name device is connecting from (based on GeoIP information).
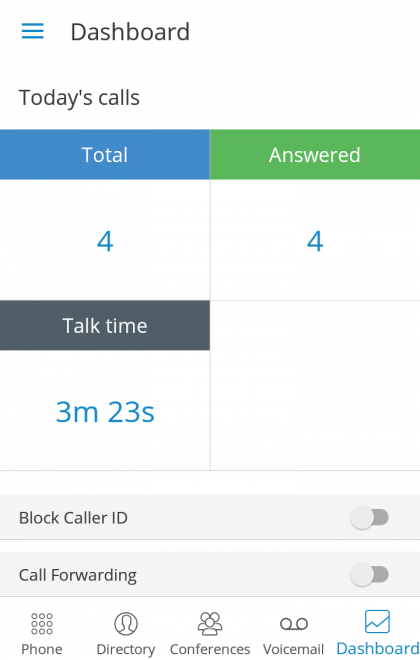
Today’s calls
Today’s calls section displays information on call statistics for current day.
- Total
- This field provides information on total number of calls (inbound/outbound) extension made today.
- Answered
- This field provides information on number of answered calls extension made today.
- Talk time
- This field provides information on total time extension was on call today. Talk time is formatted as H:MM:SS.
- Call Rating
- This field will display the amount of extension funds spent for the day. In case Call Rating is not enabled, Disabled notification will be displayed.
Settings
Settings section allows you to check status of extensions Enhanced Services, as well as option to enable or disable them.
- Block Caller ID
- This option allows you to enable or disable Caller ID blocking. Status will inform you whether Block Caller ID is turned On or Off.
- Call forwarding
- This option allows you to enable or disable call forwarding enhanced service. Status will inform you whether Call Forwarding is turned On or Off.
- Do Not Disturb
- This option allows you to enable or disable Do Not Disturb enhanced service. Status will inform you whether Call Forwarding is turned On or Off.
- Caller ID Number
- This feature will work if there are caller ID’s set in PBXWare for user’s extension. By default it is None (user’s extension).
Registered Devices
This section contains information about all devices registered to extension. In case more than one device is registered to particular extension Registered Devices section will display information about all registered devices including User Agent, IP address and Country name device is registering from (based on GeoIP information).
- User Agent
- This field provides information about User Agent type for every registered device.
- IP
- This field provides information about IP address for every registered device.
- Country
- This field will display the Country name for every registered device, based on GeoIP information for its IP address.
Italian translation
The app GUI has now been translated to Italian so our Italian users can explore the benefits of the Communicator GO app in their native language.
NOTE: Feature available in Communicator GO 5.2.1
Self Care options
Self Care options in settings include options to block your caller ID, enable unconditional call forwarding and to specify the number to forward calls to.
If the number to forward calls to is not specified, calls will be forwarded to voicemail.
Note that self care options are available if they are enabled on server side.
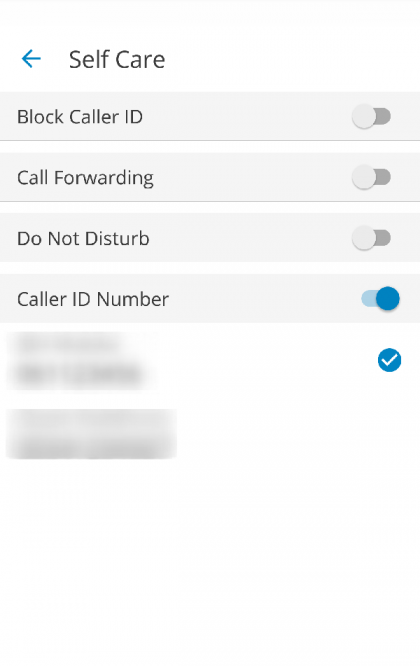
If Block caller ID option is checked, “Anonymous” will be in place of your caller ID.
If Call forwarding option is checked, all incoming calls will be forwarded to number specified under Forward calls to option.
Forward calls to option opens a dialog for entering a number to forward calls to.
Caller ID Number
When Caller ID Number is selected, user will be asked to set it as:
One time – will be used on next call, then will be turned off and set to None
Always – will be used always, until user changes it again.
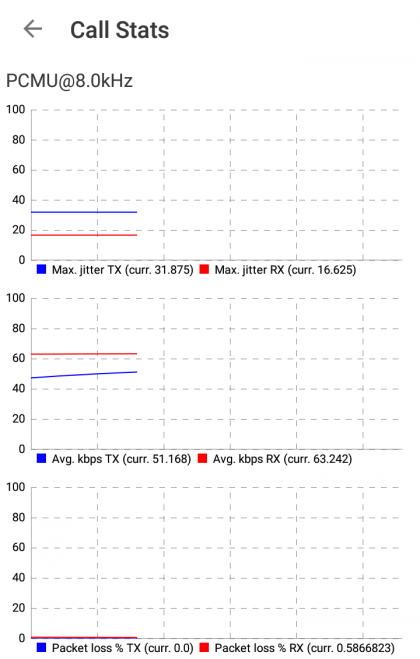
Technical information about an ongoing call
While in call, you can show technical information about it by clicking info icon (). This can be useful for diagnosing problems with call quality.
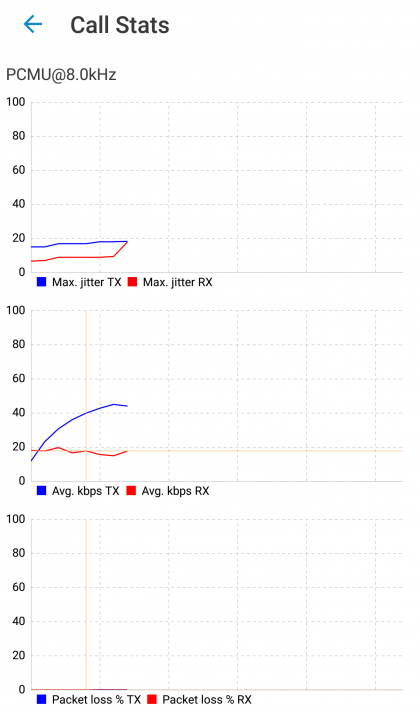
High packet loss and high jitter, both RX and TX indicate that call quality suffers due to network quality and usage.
RX stands for reception (incoming traffic) and TX for transmission (outgoing traffic).
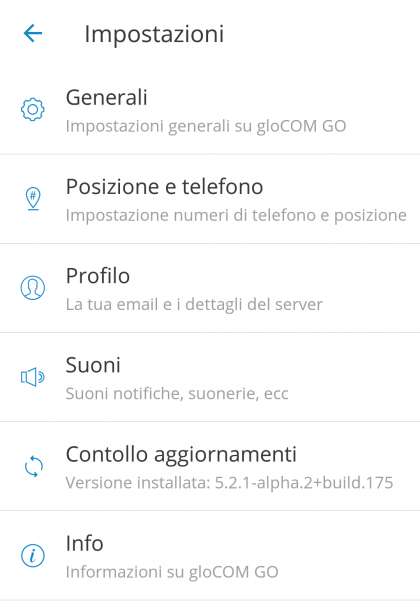
Settings
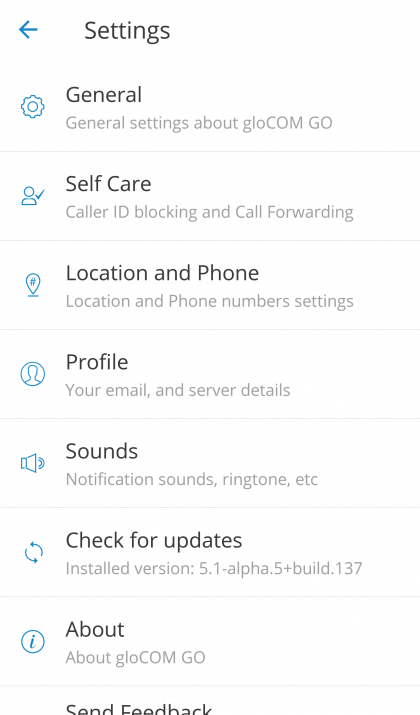
- General – option shows screen with general settings for Communicator GO.
- Self Care – selecting Self Cares will show screen with blocking caller ID and call forwarding options.
- Location and Phone – shows screen with settings for Country, SIM number, and phone numbers associated with your account.
- Profile – shows details about your account (e.g. Department, E-mail, avatar).
- Sounds – contains option to choose ringing tone for incoming calls.
- About Communicator GO – will display Communicator GO about page with version number and contact information.
- Send Feedback – option launches email client with “To” and “Subject” fields pre populated for sending feedback.
Changing avatar
You can change your avatar by opening main drawer menu and clicking avatar icon above your name and extension, as shown below.
Click on avatar icon brings options for changing avatar image. After taking picture with camera or choosing one from gallery you will have to crop your image.
Click and hold inside blue rectangle to move it.
- Click and hold blue edges to resize.
- DONE
- Done button finishes cropping and sets avatar.
- CANCEL
- Cancel button cancels cropping.
Avatar rotation
Users now have the ability to manage their avatar (rotate, flip, crop) in the Communicator GO Android app.
Open Communicator GO Android and go to Profile, click the Edit icon to the right of the user avatarand choose one of the two options:
- Take the picture using the camera.
- Choose a picture from the gallery.
After taking your photo with a camera or choosing the photo from your gallery, the photo will appear in the Communicator GO Android “Move and scale” window.
Drag the crop tool to the desired part of the photo. The part of the photo within the boundaries of the crop tool (the square) will be used as your profile image. Resize the square by dragging the corner dots in or outward. Some advanced options are available in the hamburger (three dots) menu in the top right corner such as: “Flip horizontally” and “Flip vertically”.
When ready, click on SAVE in the top right corner of the screen. The cropped image now replaces your previous profile photo.
NOTE: Feature available in Communicator GO 5.2.1
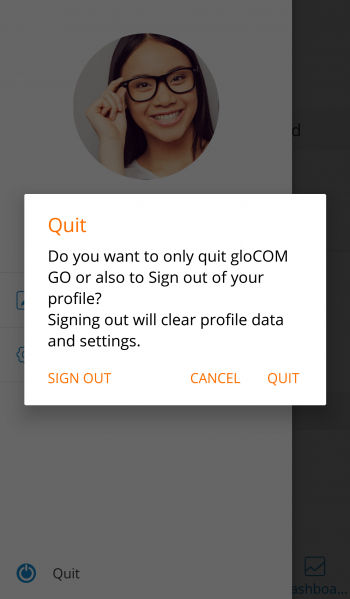
Signing out / quitting Communicator GO
There are two ways to quit Communicator GO when you click Quit from main drawer menu.
You can Sign Out, which will clear your profile data and you will be asked to provide password next time you start Communicator GO.
Or you can just Quit application. This exits Communicator GO leaving all your profile data and settings untouched. Next time you start Communicator GO you won’t be asked for password.
Troubleshooting
I’m logged in but I’m not shown as online on desktop gloCOM
When user is signed in via Communicator GO he will not appear in desktop Communicator as online unless “Online on IM or phone” option is selected in desktop Communicator settings for contacts.
Calling a contact from phone book fails
Try disabling E.164 numbers formatting in Settings -> General.
Calls work, but in-call controls (hangup, hold, transfer) don’t work
If calls can be made but in-call options (hold, transfer, hangup) aren’t working and PBXware is behind NAT with non-default ports for TCP and external IP specified make sure that External TCP port is specified as well. Log in to your PBXware and navigate to-> Settings -> Protocols -> SIP (tab) -> NAT (section) -> External TCP port.
Communicator GO Android 5.2 User Manual