Communicator 5.3
From Bicom Systems Wiki
Installation
ALL FEATURES IN Communicator 5.3 WILL BE AVAILABLE ONLY WHEN USED WITH THE SAME VERSION OF PBXware
We suggest always to use standard setup.exe instead of the MSI package if possible because standard setup.exe take care for prerequisites and installs them automatically for the user.
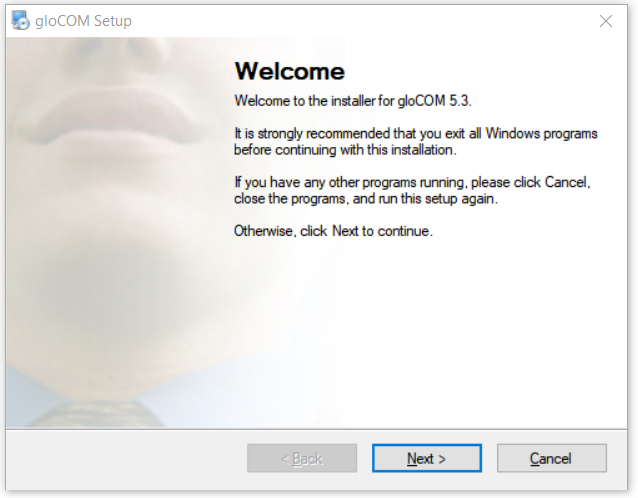 Welcome screen
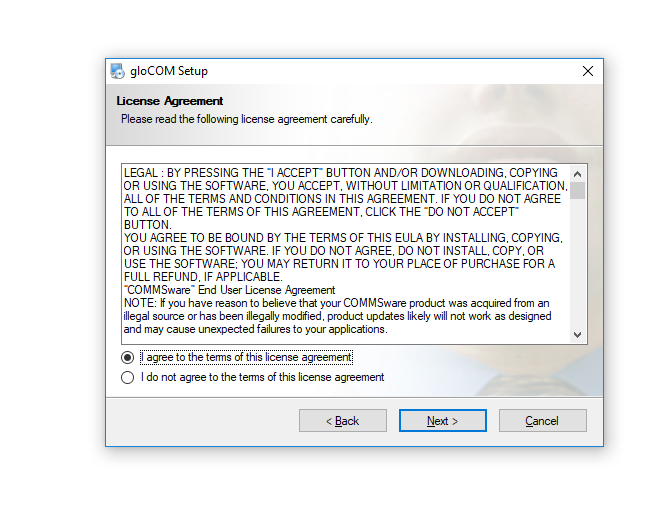 License agreement
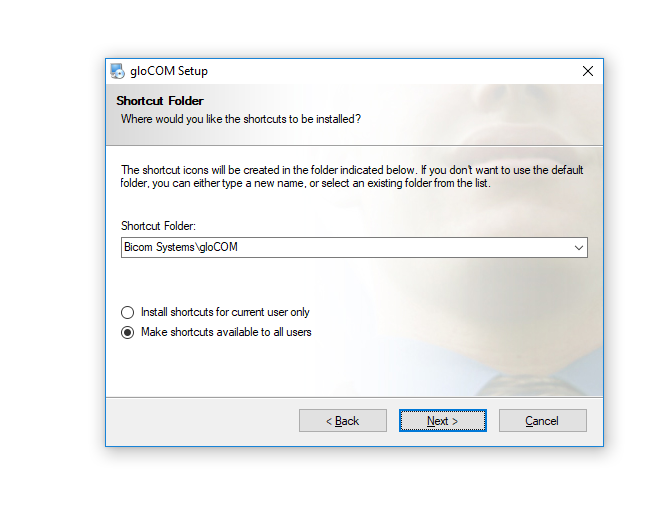 Shortcut Folder
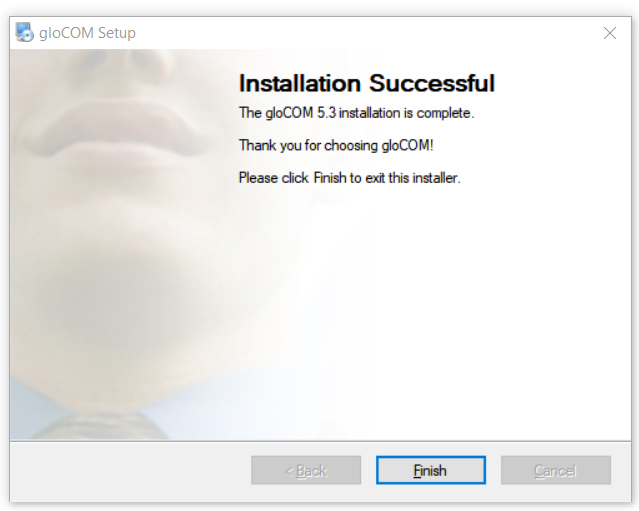 Installation Successful
Please download Communicator 5.3 from our official website www.bicomsystems.com
After the download is finished, click on the icon to start the installation.
The welcome window starts the installation process. Click on the Next button to proceed with the installation or click on the Cancel button to exit the installation wizard.
Read the license agreement and select ‘I agree’ if you accept the License Agreement. Click on the Next button to proceed with the installation or click on the Cancel button to exit the installation wizard.
The Installation Folder window sets the default location where the Communicator installation will reside. By default C:\Program Files\Bicom Systems\Communicator is offered. To select a different location, click on the Change button. When done, click on the Next button to proceed with the installation or click on the Cancel button to exit the installation wizard.
The Shortcut Folder window sets how the Communicator shortcut will be displayed on the Windows Start menu. Select the preferred shortcut under the Shortcut Folder select box and click on the Next button to proceed with the installation, or click on the Cancel button to exit the installation wizard.
The Ready-to-Install window summarizes the Installation wizard steps and displays all of the selected options. If you agree with these, click on the Next button to proceed with the installation or click on the Cancel button to exit the installation wizard.
The ‘Installing Communicator’ window shows the installation in progress.
After this step, you’ll see the ‘Installation Successful’ window. Click on the Finish button to close the window and finish the installation.
MSI package Installation
- In order to install Communicator from an MSI package, the following are the prerequisites and must be installed before MSI package :
- 1. Microsoft Visual C++ 2015 Redistributable (X86)
- 2. Microsoft .NET Framework 4 (or above) (optional, if the user wants to use functionalities like Outlook plugin, Skype For Business integration etc…)
If there is no Visual C++ installed users might get installation errors
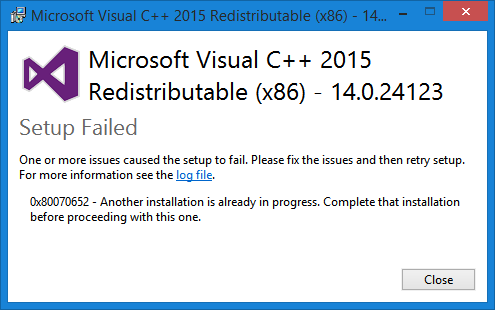

Setup Error
IMPORTANT: Windows Terminal Server installation
Configuring Communicator
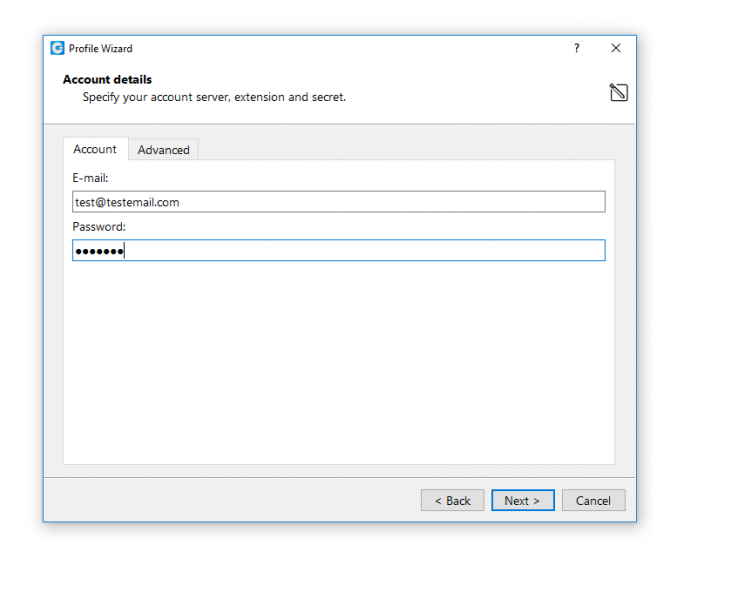 Account Details
 Advanced
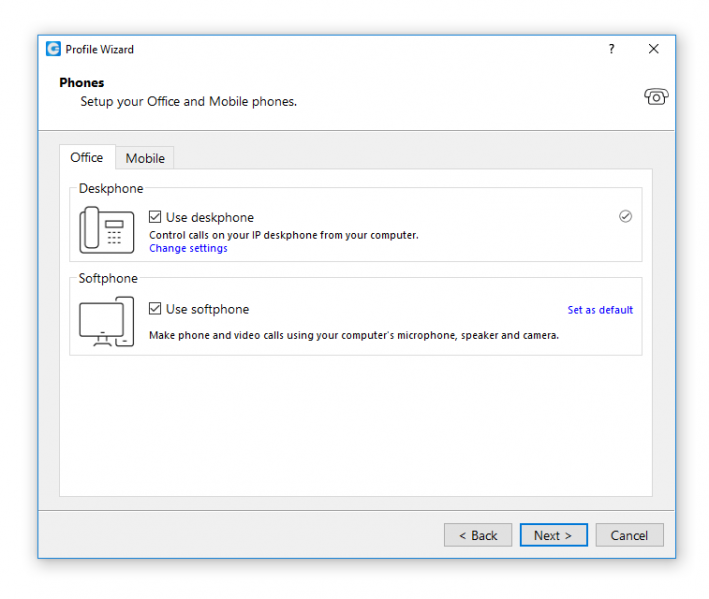 Phones
After the installation process, you need to configure Communicator.
Click on the Communicator icon and the Profile wizard will appear. To continue with the configuration click the Next button.
1. Account details
- Make sure you have received your account details from your system administrator or account manager. The received details must include:
- Account
- – E-mail, for example: example@bicomsystems.com
- – User password, for example: 93sU2e_2%
- Advanced
- – Server address, for example: voip.bicomsystems.com or 134.23.211.23
- – SIP proxy (leave empty to use server settings)
- NOTE: In Communicator 5.3, instead of an extension and secret, users will provide their e-mail assocciated with extension and User password.
After you click Next, Communicator will try to connect to the specified server with the user’s account details. If the account details are wrong, a red warning will appear. Otherwise, a Change Password pop-up window will appear telling you to change your password since this is the first time you are logging in. Your password has to be at least 8 characters and 85% secure. Users are required to change this password on login and once changed it is hashed and unknown for all administrators of the system.
2. Communicator edition
- Select Communicator edition. You may choose between Office, Business, Agent (Call Center), or Supervisor (Call Center).
3. Setup office and mobile phone
- Setup your Office phones. If you choose softphone, you will be able to place and receive calls using your computer. If you choose desk phone, you can control calls on your IP desk phone from your computer. Selecting the checkboxes for both desk phone and softphone will allow users to switch between devices when initiating a call and also to pick which device they would like to answer incoming calls on.
- NOTE: If you use Polycom phones, click on ‘My desk phone is Polycom’. Provide the phone’s IP address and click Configure. This will help Communicator to identify and configure Polycom phones.
- In Communicator 5.3, users can assign Mobile Numbers that they would like to receive calls on when not at their desk. Click the Mobile tab and click + icon to add Mobile phone number and it’s label.
Click Next and a configuration summary window will appear. Please check the profile details and make sure they are correct. Click Finish and you will be automatically logged in with your account. Now you are ready to use Communicator with all its features.
Working with Communicator
Log In
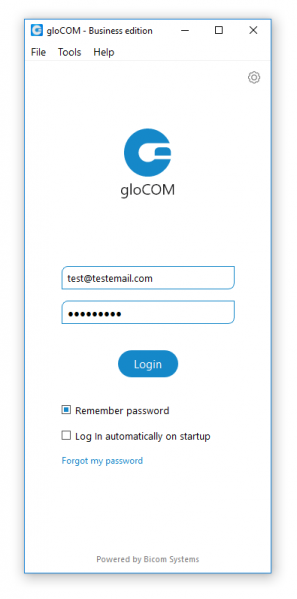 Log In
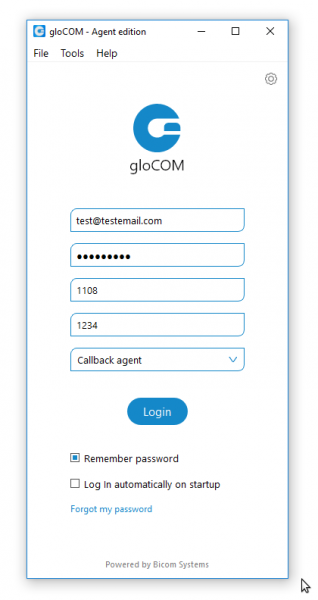 Log In Agent Edition
- E-mail:
- Provide the e-mail address that is assigned to your extension.
- Password:
- Enter the password that you created during the Communicator configuration.
- Remember password
- Check if you want Communicator to save your password.
- Log In automatically on startup
- When this option is turned on, Communicator will log in automatically. Every time Communicator is started, it will automatically log in.
- Forgot my password
- If a user forgets his password, he can recover it by clicking the ‘Forgot my Password’ link. The user will receive a password recovery link via email.
- Login Failure message
- The login failure message is changed in Communicator 5.3 with the more intuitive message “Login Failed: Username or Password is Incorrect”.
NOTE: Options for Agent edition login
- Agent number:
- Enter the Agent number that you created during the Communicator configuration.
- Agent pin:
- Enter the Agent pin that you created during the Communicator configuration.
- Agent type:
- Select Agent type from drop down, dynamic or callback agent .
Toolbar
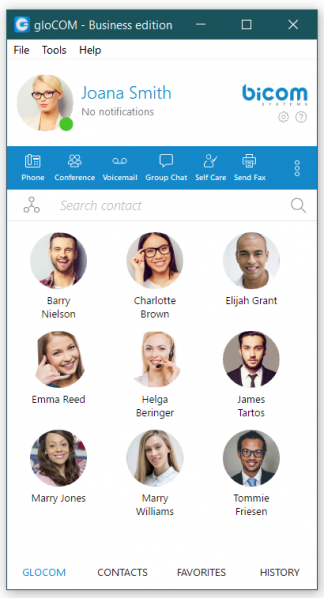 Communicator Toolbar
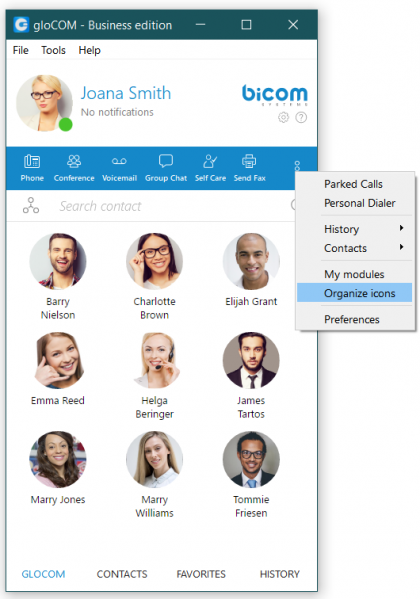 Organize Icons
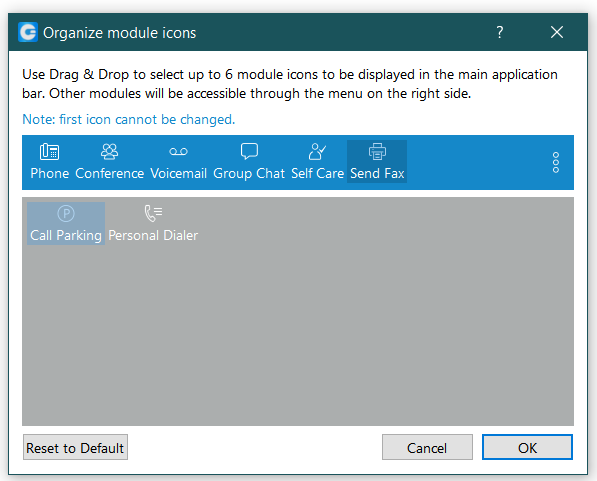 Organize Icons
- User image
- A user-defined image that is displayed on the user’s profile.
- You can change your avatar image by clicking on your current avatar and a new window will appear with avatar settings. Browse for the image from your computer and set the preferred image options.
- Communicator now supports higher resolution avatars, allowing users to set up any resolution between 256×256 and 512×512 pixels
- Reset Profile picture to Default
- In Communicator 5.3 this new feature enables users to reset profile picture to default :(no profile picture). When a user clicks on their avatar in Personal :Information dialogue they are presented with a message box so they can choose :if they want to change their avatar or to reset to default one. Note that if :the user has no avatar, no message box is presented, since then their only :option is to set another avatar (or cancel).
- Username
- User defined name which is shown in your chat conversations.
- Missed Calls
- Displays any missed calls or reads No Missed Calls.
- Status and Status Message
- If left-clicked, a menu will open. The user will be able to choose his availability: Online, Busy, Do not Disturb, Away, and/or Offline. In My Settings -> Status, users can set their personal messages or news and upload their profile picture.
- Phone
- Opens a softphone window next to the Communicator main window.
- Voice Conference
- Opens a Voice conference window next to the Communicator main window.
- Group Chat
- Opens a Group Chat window next to the Communicator main window.
- Voicemail
- Opens a Voicemail window next to the Communicator main window.
- Fax
- Offers the choice to send a fax or view received faxes. Based on your choice, an additional window will open next to Communicator.
- Surveillance Camera
- Opens up a Surveillance Camera preview. This option will work only if you have your surveillance camera set up on the IP address in Tools –> Preferences –> Video –> Surveillance Camera.
- Online Self Care
- In order to login to Online Self Care, point your browser to: http://$IPADDRESS/ (For Example: http://192.168.1.1/)
-
- Email: The email address assigned to the extension
- (ex. The provided email address is used as a username for logging into Online Self Care
- (e.g. email@example.com))
- ([a-z] [0-9] [@_.-])
-
- Password: Password assigned to the extension
- ([a-z] [0-9] [@_.-])
- Parked calls:
- Once a call is parked, it can be picked up by anyone at any location by dialing the parked extension.
- In the PBXware there is a default parking lot defined in Access Codes. When a user presses “Park” button inside call window in Communicator 5.3, they are presented with a drop-down so they can choose a lot to park.
- Search
- Opens a Search panel below the toolbar. Type the name of the contact that you wish to locate in the search panel.
- Settings
- Opens a Preferences window. Refer to the Preferences chapter for detailed instructions.
- Help
- Redirects to our official website: www.bicomsystems.com. Additional documentation and guides are available on our official website www.bicomsystems.com If you still have any questions, please feel free to contact our support department.
- Icons for modules
- Inside Communicator 5.3 can be personalized. Phone icon must be there in the first place and next 3 can be defined by user. To edit menu on the right upper side of the Communicator 5.3 and choose Organize icons.
- Inside Organize module icons window, arrange icons as desired with simple drag and drop.
Personal Dialer
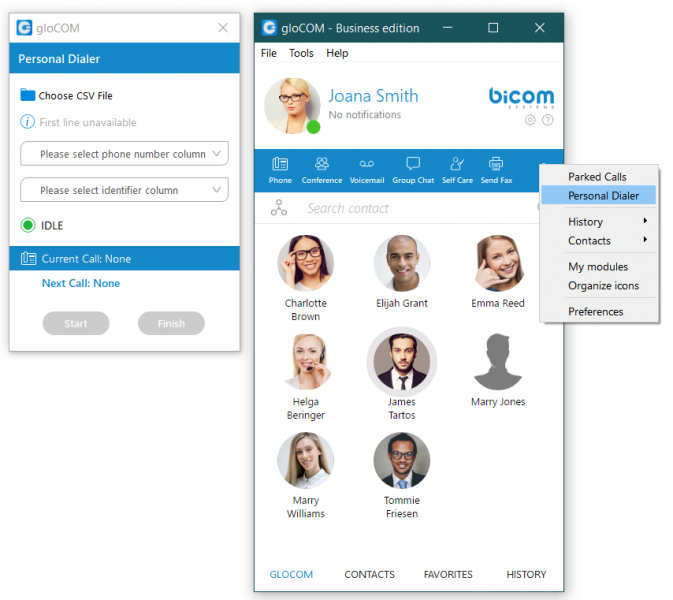 Personal Dialer
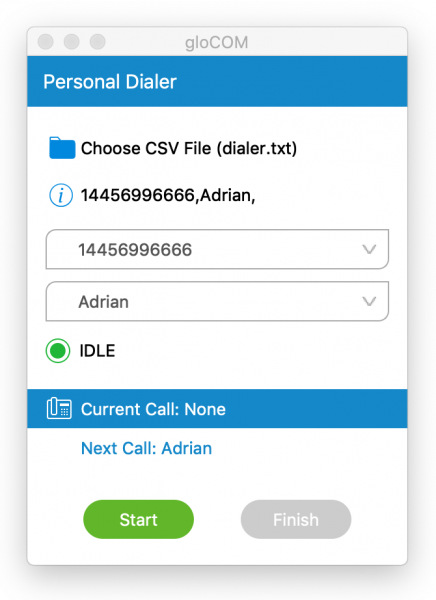 Personal Dialer
Personal Dialer enables users to load a CSV file inside Communicator 5.3 and to dial numbers from that file one after another. This is useful for people who dial the same list of numbers every day, so they don’t have to copy-paste each number. When you open the Personal Dialer module, you are presented with this window:
After loading a file first line from the file is shown in the “info” section, so a user can have a preview of the file structure. Then they have to select phone number column, so Communicator 5.3 knows what to dial. Optionally they can choose identifier column which is useful for labelling numbers with a name.
For example in the file:
- 101,Joana Smith, Street A Miami
- 102, James Tartos, Street B London
The first column would be number, and the second would be an identifier(person name, company name etc.). This identifier is used in “Current Call” and “Next Call” labels so a user can have an idea who is going to be dialed next. After he presses “Start” Communicator 5.3 proceeds to call the first number from the list if there are no other calls at the moment. Numbers are being dialed one after another, but a user can pause dialer at any time if they want to. Dialing is finished after the end of the list is reached, or if a user finishes dialing.
Destinations and Communicator Modules
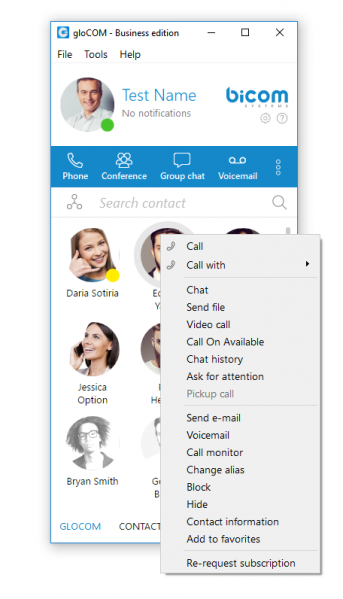 Right Click
Communicator can place a call to any system destination, for example: extensions, queues, conferences, voicemail, system calls, or parking. Calls can be placed with a drag-and-drop motion from one extension to another, or directly from the phone display to the extension, for example. Right clicking on a contact name offers more possible actions regarding the selected extension.
This way the user can:
- – Make a call from Communicator
- – Make a Video Call from Communicator
- – Chat with the selected contact
- – Send an email to a contact
- – Block the selected contact
- – Call the selected contact On Available
- – Check Voicemail
- – Monitor calls
- – Add the selected contact to ‘Favorites’
- – See more information about the contact
- – See a chat history with the selected contact
- – Re-request subscription
Placing Phone Calls
 Placing Phone calls
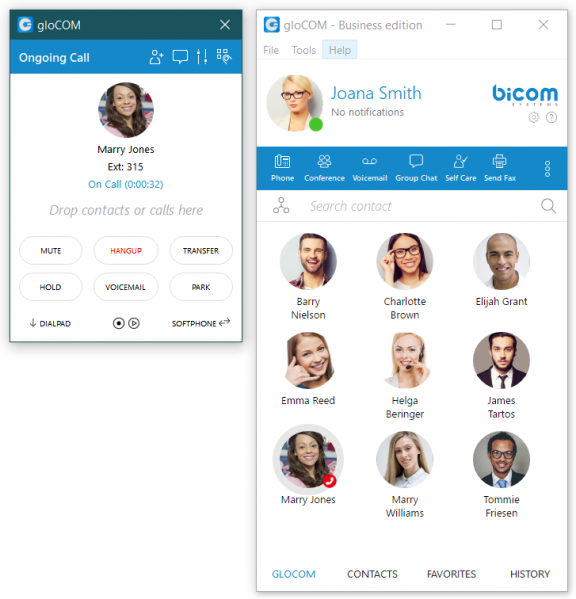 Live call
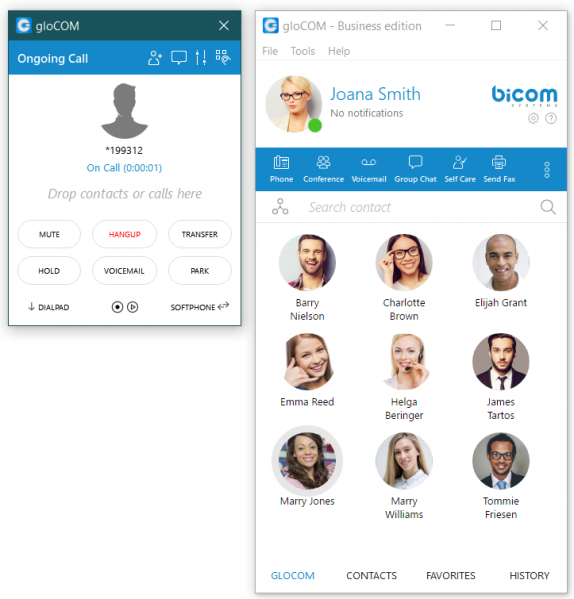 Call Monitoring
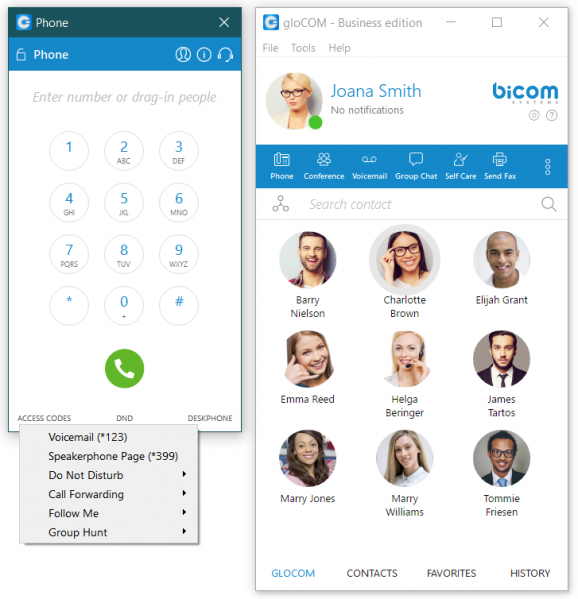
1. Open Phone module
- Click on the Phone module icon to show the Phone module.
2. Dial entering the phone number
- Use the Phone module dial keypad or keys on your keyboard to enter the phone number you want to dial.
- Click on the Dial icon to place a call.
PCI compliance
The user is on a phone call with an agent, and the caller needs to perform a payment, he needs to say his credit card obviously. Agents “turn on” an option in Communicator 5.3 that will detect DTMF from the caller, and enter them into a text field by “simulating keypress” with DTMF digit. This way caller does not “send credit card” by voice, but rather through DTMF, straight into the field on a
web site for payment. Inside call window there is an icon for activating this feature. After activating,DTMF that other side inputs are written wherever your cursor is positioned. You can stop receiving remote DTMF by either pressing the icon again, clicking on the “Stop Remote DTMF” button or by ending the call.
Show entered DTMF
New feature is Show entered DTMF, but many devices do not handle it well. So when user is entering DTMF in Deskphone mode, nothing basically happens visually nor audio notifications are present. What we could do to improve is to display entered DTMF on the screen at least, something like Telephone app does (see images, we dial voicemail and press 0199 on keyboard, we do not hear
audio notifications but we see it on screen).
3. Dial with Drag and Drop
- With your mouse click and hold any contact from the contact list, then drag the selected contact from the Communicator list to the phone module area, and Release (Drop) the contact.
- Click the Dial button to place a call.
Live call
4. Transfer options:
- Blind/transfer to a phone number: Type in some number (i.e. mobile phone) and transfer the call to it.
- Transfer to another ongoing call: If a user has 2 or more active calls, he can transfer the calls from one to another. One simple scenario is:
A Communicator user is talking to John Doe. He receives a call from Allison Smith while speaking to John Doe. The Communicator user is now able to add Allison Smith to the existing call with John Doe and all 3 participants will now hear each other.
When trying to transfer a call via Communicator 5.3, when choosing a contact from your list you can now see the google and outlook contacts in dropdown list.
Also, users can press enter to confirm transfer (previously pressing enter cancelled transfer dialogue which was confusing).
5. Switch phone
- During a live call, you can use the Switch Phone button to initiate ringing across all registered devices so the user to continue the call on another device. A perfect example would be switching from your desk phone to your mobile when you need to leave your office but would like to continue your call.
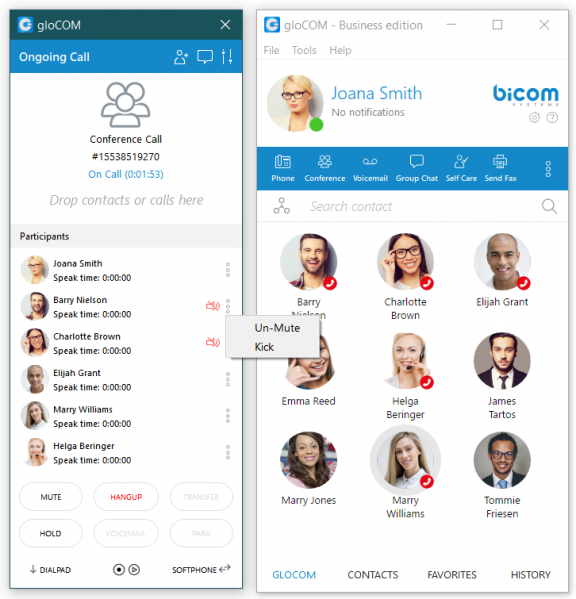
6. Call Monitor
If your administrator enables Call Monitor on your extension in PBXware Enhanced Services, you will be able to listen to any call in real time. When a call is placed, right click on the user that is on call and choose Call Monitor. You can escalate from silent monitoring to “barging in” to speaking with all parties.

Call Monitoring
Phone
 Communicator Modules
 Communicator Modules
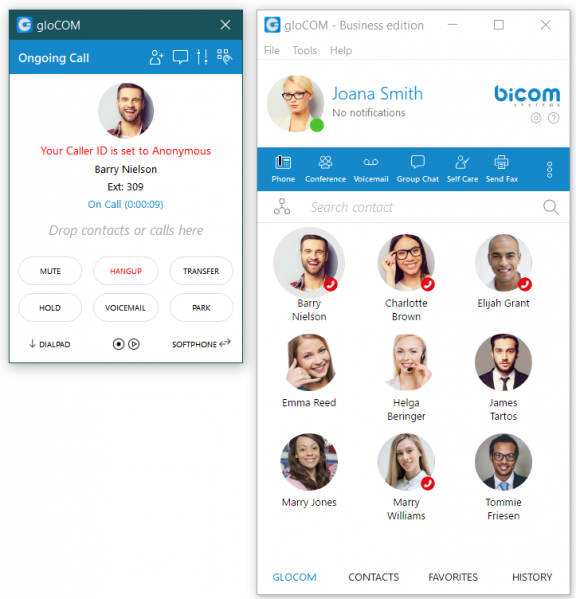 Communicator Modules
The phone module area where information about possible missed calls is shown.
- From the phone module you can set up office and mobile phones by clicking the settings icon next to missed calls information.
- Select your audio device by clicking the headset icon. It points to the Preferences->Phone->Audio devices section where you can choose which Input, Output, and Ringtone device to use.
- NOTE: In Communicator 5.3 default ringtones are different for inbound and outbound calls when using softphone.
- Before it was the same ringtone and it was hard to distinguish whether it was an inbound or outbound call.
- A green (or eventually red) circle shows the Phone module connection status. If green is shown, the Phone module is connected and the user can place calls. If a red circle is shown, the Phone module is not connected and the user is unable to place a call, in which case the user should contact their system administrator.
- The attachment sign is used to attach the phone module to the PBXware window.
- In the Phone module you can see which phone mode is set by default. If you have selected both modes, click on the dropdown menu and switch to another mode. Next to this dropdown there is a DND icon with the option to set your status to Do Not Disturb.
- Phone module area where a contact is shown after the Drag-and-Drop action.
- Phone module area where a dialed contact’s phone number is shown.
- Speaker volume tuner. Adjust the speaker volume by moving the slider up or down. Do not increase volume more than needed because it can induce hearing loss.
- Microphone volume tuner. Adjust the microphone volume by moving the slider up or down.
- Phone module dial keypad. Used for entering phone numbers.
Users are able to block caller ID directly from Communicator.
Two options are available: “Hide Caller ID” and “Hide Caller ID for next call only”.
If option is selected, the icon marked in next screenshot will change color until the call is
finished.
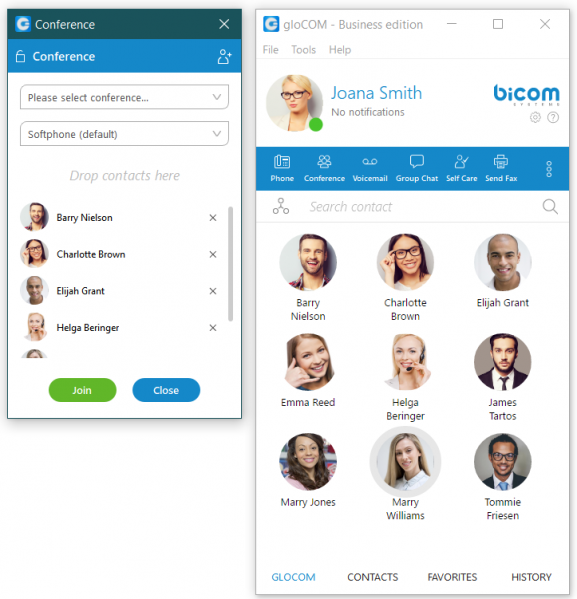
Voice Conference


 Voice Conference
- Plus sign used to invite a contact using his landline or mobile number.
- The attachment sign is used to attach the phone module to the PBXware window.
- Select a box to choose from a conference room

- The Voice Conference module area where a contact is shown after Drag-and-Drop.
- To remove a contact from a Chat Group, click

- Click on Start button to start the Voice Conference.
- Click on Close to close the Voice Conference.
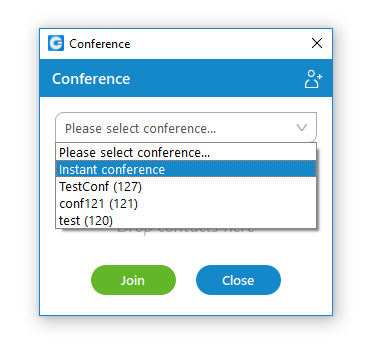
Conference can be created from dropdown list, Instant and Predefined conferences can be selected.
- Instant conferences – User can create conference by adding one or more people to ongoing call. With this option you can add extensions or any number available from your contact list.
- Predefined conferences – Users can join predefined conference rooms and add other participants.
Chat in a Group
Add user(s) to an existing chat conversation
Button in top bar of the chat module “Add users into this chat” add participants in existing
chat.
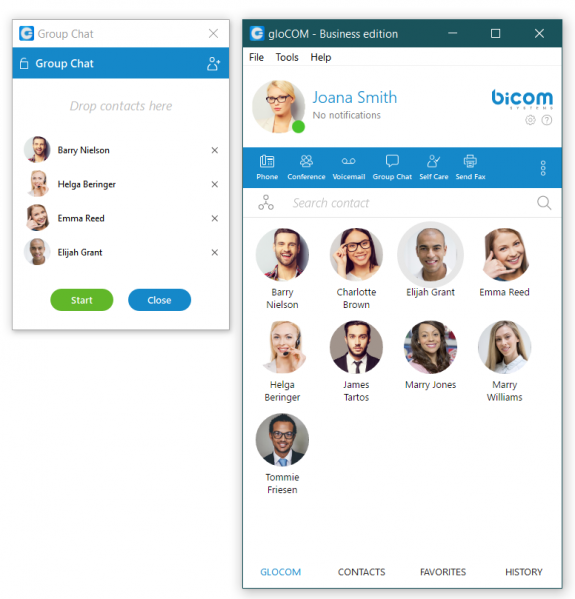 Group Chat
1. Open Group Chat module
- Click on Group Chat module icon to show Group Chat module.
2. Group Chat with Drag and Drop
- With your mouse click and hold any contact from the contact list, then drag the selected contact from the Communicator list to the Group Chat module area, and Release (Drop) the contact. Repeat this action to Drag-and-Drop more contacts into the Group Chat.
- Click on the Start button to start a Group Chat with the selected contacts.
- Group Chat module area where the name of the module is shown.
- Attachment sign is used to attach phone module to PBXware window.
- Group Chat module area where contact is shown after Drag and Drop action.
- To remove a contact from the Chat Group, click on
Voicemail
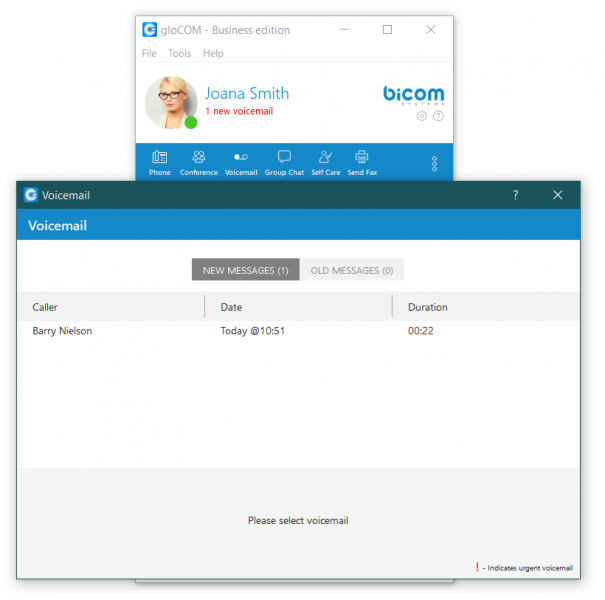 Voicemail
- Select a Voicemail message and click
 to delete it. Please note, voicemail delete is permanent.
- Click
 to move the selected voicemail message to the old messages directory.
- Click
 to place a call to a contact who left a voicemail message.
- Click
 to save a voicemail file to the disk.
- Click
 to play the selected voicemail message.
- Click
 tab to show new voicemail messages.
- Click
 tab to show old voicemail messages.
Agent panel (available only in Communicator Agent edition)
Agents
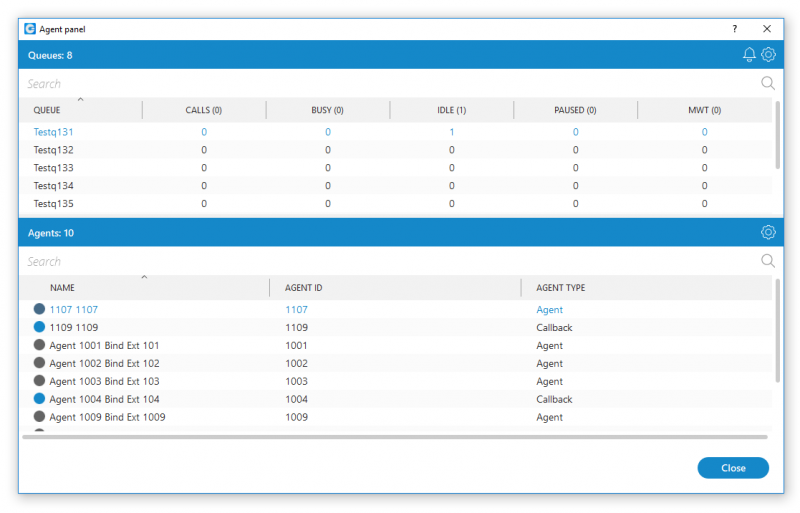 Agent Panel
- Search agents:
- Search can be based on agent’s number or name.
Settings
1. Agents:
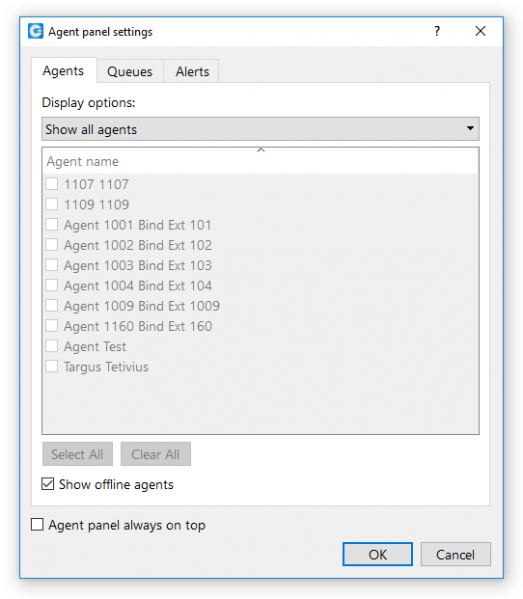 Agent Panel Settings
- From drop down list, user can select the following options:
- Show only agents from my queues
- Show all agents
- Show custom selected agents
- Show offline agents:
- Click on check box for this option in case you want to see offline agents.
- Agent panel always on top:
- Click on check box for this option in case you want to set the agent panel always on top.
2. Queues
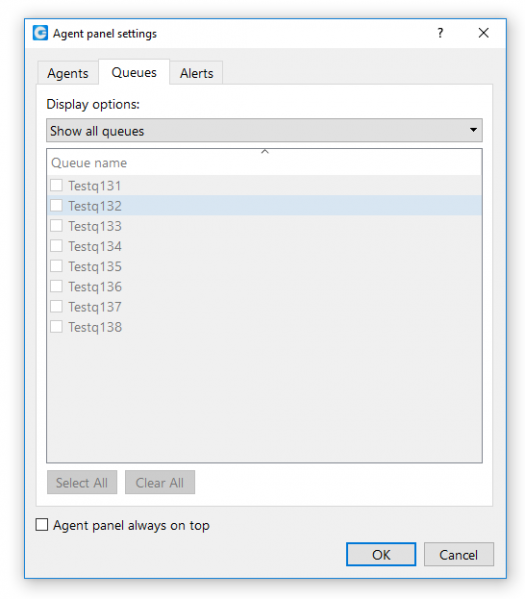 Settings Queues
- The following display options are offered:
- Show my queues only
- Show all queues
- Show custom selected queues
- Agent panel always on top:
- You will use this option in case you want to set agent panel always on top.
3. Alerts
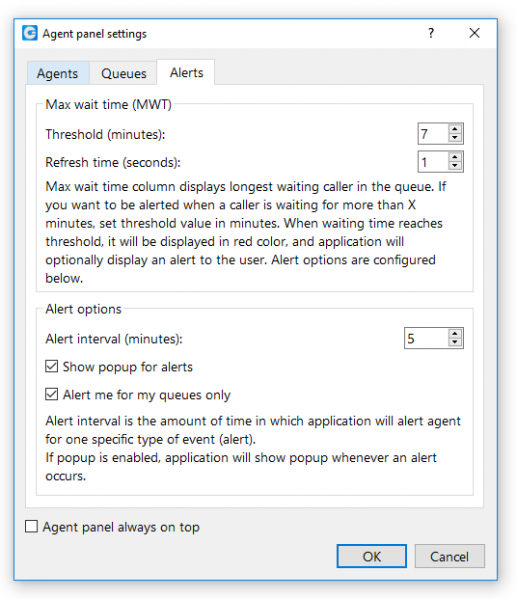

Alert Settings
- Max wait time (MWT)
- Threshold (minutes): Select or enter the number which will represent Threshold in minutes.
- Refresh time (seconds):
- Select or enter the number which will represent Refresh interval in seconds.
- Alert options
- Alert interval (minutes):
- Select or enter the number which will represent interval in minutes after which alert will repeat.
- Show popup for alerts
- Click on check box if you want to show popup for alerts.
- Alert me for my queues only
- Click on check box if you want to receive alerts only for agent’s queues.
- Turn off alerts in Agent edition for callers waiting more than 7 minutes in a queue.
- Agent panel always on top
- Click on check box for this option in case you want to set agent panel always on top.
Queues
- Search queues:
- Search queue based on queue number or queue name.
- Alerts:
- Clicking on “Alert” option, list of alerts is displayed. Here you can delete alerts, or change already configured options for alerts in Settings section.
- Settings:
- This option is same as Agent Settings.
Hide Agents/Queues
- This option is used if you want to see only one of the Agent or Queue section. For example, in case you want to display only Agents, you will click on “Hide Queues” option.
Placing Video Calls
To place a video call, right click on a Communicator contact and select Video Call from the drop-down menu.
Sending Fax
 New Fax
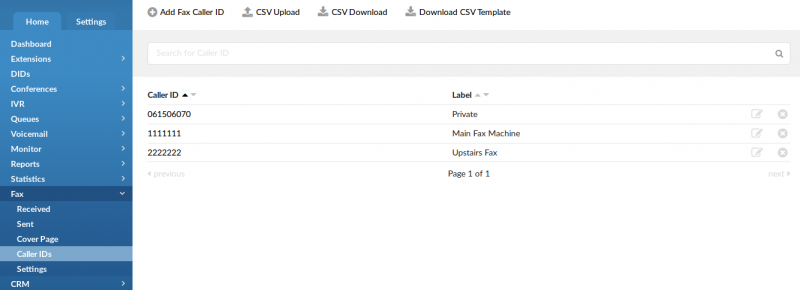 Fax Caller ID
 Fax
Fax1. Outgoing faxes
- Click on the Fax module icon, then select Send fax to open the Fax module.
- Read the information message and click the OK button.
PDF file:
- Enter the path or browse for a PDF file that you wish to send using the icon.
Information that you enter in the Send Fax wizard will be displayed on the Fax cover page if you choose to send a cover page.
In the Send Fax window you can see two sections, To and From.
TO Section
- Name:
- Enter the name of the recipient. For example, Tim Barr.
- Fax:
- Enter the phone number to which you want to send your fax, for example, 02033998800.
- Phone:
- Enter the phone number of the recipient.
- Email:
- Enter the recipient’s email.
- Company:
- Enter the recipient’s company name.
FROM Section
- Name:
- This field will be automatically populated with your Communicator username.
- Caller ID:
- Caller ID is a drop-down menu with the list of caller IDs allowed for an extension. Caller IDs are added from the PBXware GUI.
- Fax:
- Enter your fax number.
- Phone:
- Enter your phone number.
- Email:
- Enter your email.
- Company:
- Enter your company’s name.
Additional information like comments and status can be entered also.
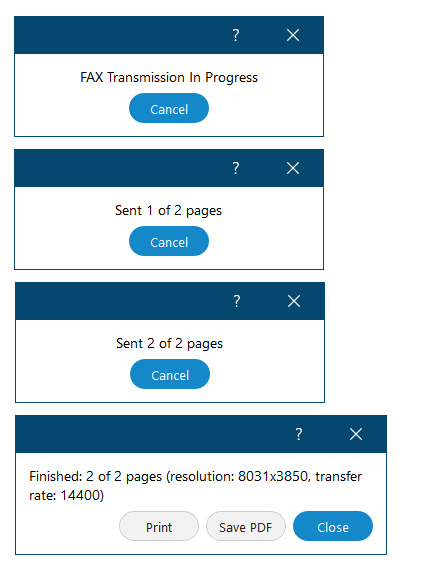
When sending fax user is presented with a “Sent X of Y pages” so fax sending progress is more detailed. This feature affects only the server side, so it should work with old Communicator and 5.3 as well.
2. Incoming faxes
- Show list of all received and pending fax documents.
Supervisor panel (available only in Communicator Supervisor edition)
 Supervisor Panel
Toolbar
1. Show users
- If you click on this option, your Communicator will appear.
2. Full Screen
- Click on this option if you want your supervisor panel to be on whole screen. With your second click on this option, you will restore your screen size to previous size.
3. Slide Show
- When you click on this option all content of “Wallboard” will be displayed as a slide show. With second click on this option, slide show will stop.
4. Zoom In/Out
- This options can be used to increase/decrease font size for content of all sections except “Wallboard” section.
5. Default size
- This option restores font size to default size.
6. Preferences
 Preferences
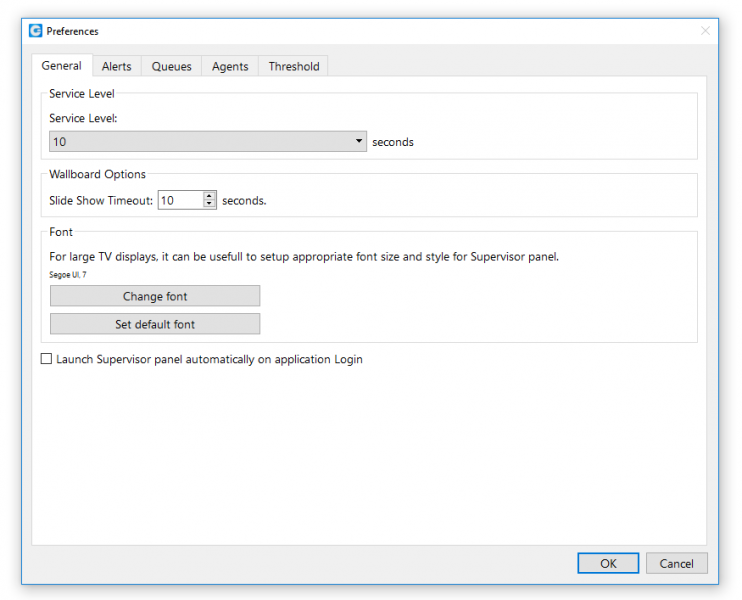
- General
0
- Service level:
- Select time in seconds (ex. 10)
- Wallboard Options – Slide Show Timeout:
- Select timeout for slide show (in seconds).
- Change font:
- For large TV displays, it can be useful to setup appropriate font size and style for Supervisor panel. by clicking on this option, you can change the font and style.
- Select default font:
- Switch to the default font and style.
- Launch Supervisor panel automatically on application Login:
- If you click on check box for this option, after supervisor logs in, supervisor panel will automatically be shown.
- Alerts
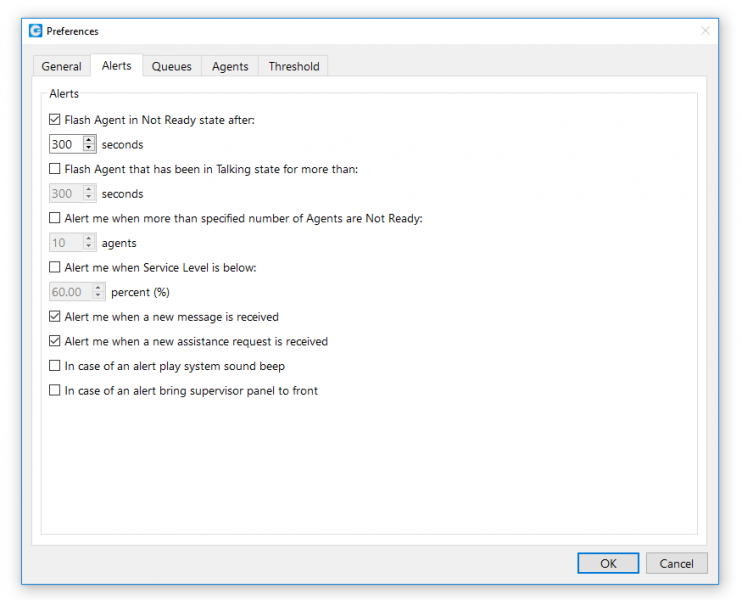 Alerts
- Flash Agent in Not Ready state after:
- Choose time in seconds when alert will flash if agent is not ready.
- Alert me when more than specified number of Agents are Not Ready:
- Choose number of Not Ready agents after which the alert will popup.
- Alert me when Service Level is below:
- Choose percent of service level after the alert will popup.
- Alert me when a new message is received
- Click on check box to enable this option.
- Alert me when a new assistance request is received
- Click on check box to enable this option.
- In case of an alert play system sound beep
- Click on check box to enable this option.
- In case of an alert bring application
- Click on check box to enable this option.
- Queues
-
- 1. Overview
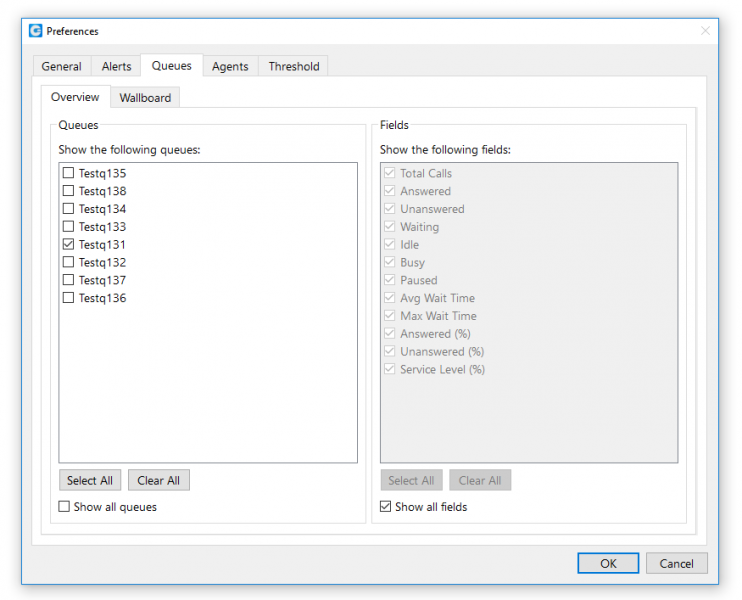 Queues Overview
- Show the following queues:
- Select the queues you want to be displayed in Queues module.
- Show the following fields:
- Select the field you want to be displayed in Queues module.
- Select all
- Select all queues/fields if you want all queues/fields to be displayed in Queues module.
- Clear all
- Click on Clear all queues/fields if you don’t want to any queue/field be displayed in Queues module.
- Show all queues
- Click on check box for this option to display all queues.
- Show all fields
- Click on check box for this option to display all fields.
-
- 2. Wallboard
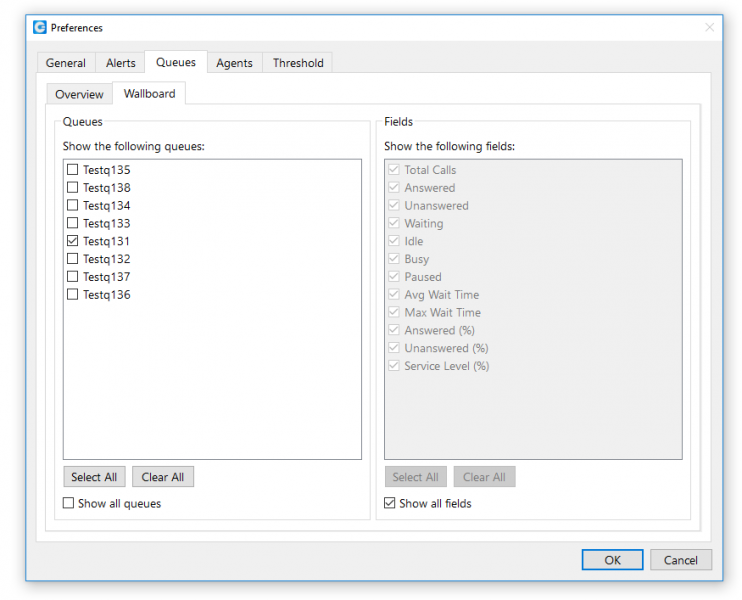 Queues Wallboard
- Show the following queues:
- Click on check box next to a queue you want to be displayed in Wallboard module.
- Show the following fields:
- Click on check box next to a field you want to be displayed in Wallboard module.
- Show all queues
- Click on check box for this option if you want all queues to be listed.
- Show all fields
- Click on check box for this option if you want all fields to be listed.
- Select all
- Click on check box for this option if you want all queues/fields to be displayed in Wallboard module.
- Clear all
- Click on check box for this option if you want to uncheck selected queues/fields.
- Agents
 Agents
- Specify which agents to show:
- Select which agents will be shown in Agents module.
- Specify which SIP/IAX members to show:
- Select which SIP/IAX members will be shown in Agents module.
- Select all
- Click on check box for this option if you want to select all agents or SIP/IAX members.
- Clear all
- Click on check box for this option if you want to uncheck selected agents or SIP/IAX members.
- Show all agents and members
- Click on check box for this option if you want to show all agents and members.
- Threshold
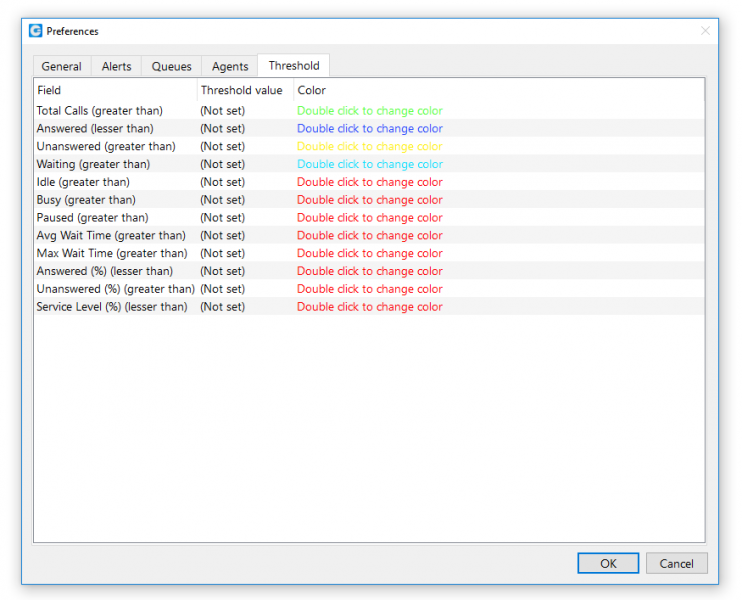 Threshold
- Field:
- Various field are displayed, such as: Calls Offered, Calls Unanswered, service Level (%), etc.
- Threshold value:
- Set the value for particular event.
- Color:
- Used to define which color should be used for a particular event if the number is larger than zero.
Modules:
Queues
 Queues
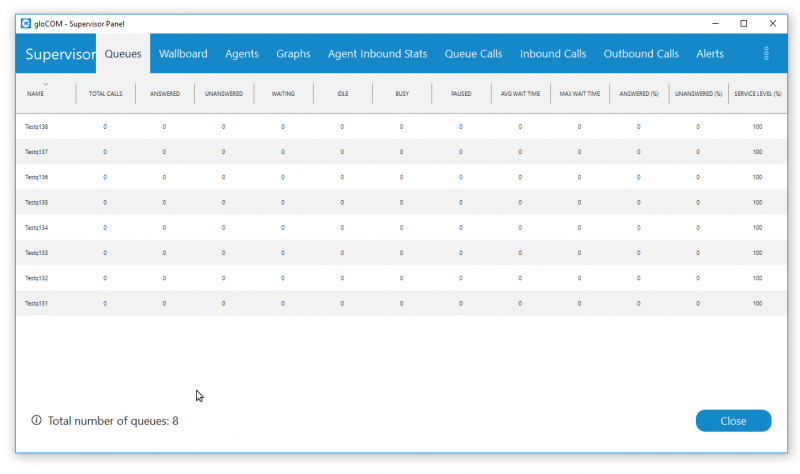
The QUEUES module displays a list of all queues that the user (supervisor) has permissions to monitor.
The following list shows the following information in real-time:
- Total calls for the current day (calls offered)
- Calls answered for the current day
- Calls unanswered for the current day
- Calls waiting
- The following items apply for any type of agent (static, dynamic or callback):
-
- Members idle
- Members busy
- Members paused
- Average Wait Time (AWT) for the current day (in seconds)
- Maximum Wait Time (MWT) for the current day (in second)
- Calls Answered (%) for the current day
- Calls Unanswered (%) for the current day
- Service Level (%). This field is calculated as the percent of calls that have been answered within a specified period of time.
This can be configured in the Preferences window.
Wallboard
The Wallboard module displays agent information in real-time. The Wallboard is displayed in a large format intended for use with televisions or other large screens.
User can choose whether he/she wants to display all queues or specific ones, and whether he/she wants to display all real time information or specific ones.
Which real time information user wants to display can be set in Preferences.
 Wallboard
- Call Offered:
- Displays the number of total calls received during an outgoing work day.
- Call Answered:
- Displays the total number of answered calls during an outgoing work day.
- Call Unanswered:
- Displays the total number of unanswered calls during an ongoing work day.
- Call Waiting:
- Displays the total number of calls waiting in the queue to be answered by the next free agent.
- Members Idle:
- Displays the total number of agents currently not busy and waiting for an incoming call.
- Members Busy:
- Displays the total number of agents currently busy.
- Members Paused:
- Displays the total number of agents unavailable.
- Average Wait Time:
- Displays the average amount of time callers must wait to reach an agent.
- Max Wait Time:
- Displays the maximum amount of time callers must wait to reach an agent.
- Call Answered (%):
- Displays the percentage of answered calls during an ongoing work day.
- Call Unanswered (%):
- Displays the percentage of unanswered calls during an ongoing work day.
- Service Level (%):
- Displays the percentage of service during an ongoing work day.
Agents
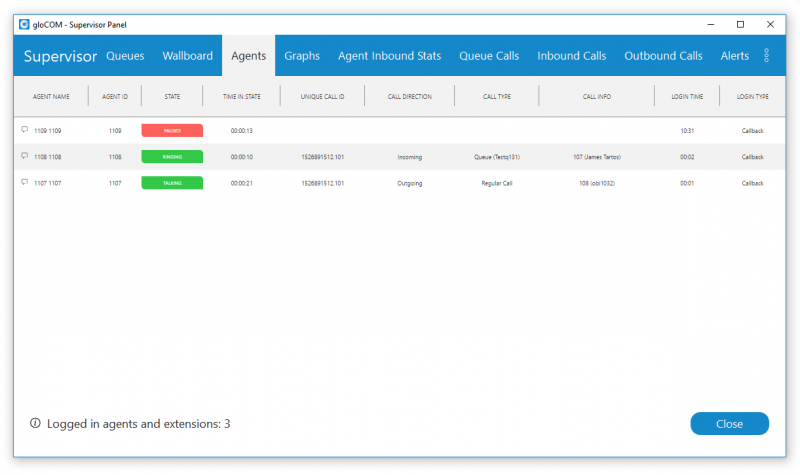
The AGENTS module shows details about agents that the user has permissions to monitor and that are currently logged in. All types of agents, including static, dynamic, and callback, are displayed here.
 Agents
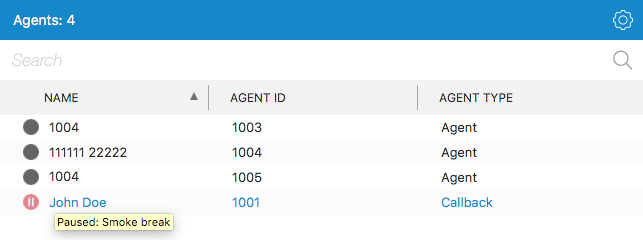 Agents
 Agents
The following information is displayed for each agent:
- Name
- Extension (agent number)
- State (busy, paused, etc.)
- Time in State
- UID of the Current Call
- Call Direction
- Call Type (inbound or outbound)
- Call Info
- Login time (how long the agent has been logged in)
- Login type (static, dynamic, or callback)
- Assistance Request Icon (appears when a specific agent requests assistance from supervisors)
In Communicator 5.3 agents are able to see other agents pause reason. There is a tooltip over each agent name that shows their current status (i.e. on call, busy, paused etc…).
Same info is available in the agent info dialog (right click – > agent info).
Graphs
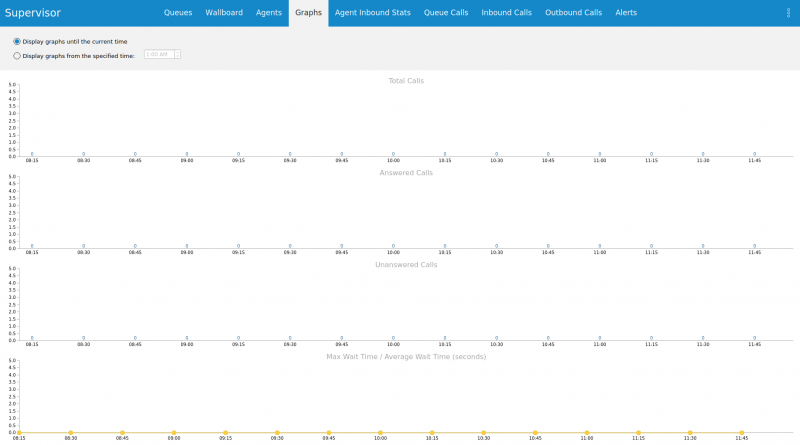
The GRAPHS module shows real-time call statistics in the form of graphs.
 Graphs
The following information can be displayed:
- Received calls
- Answered calls
- Unanswered calls
- Average wait time and maximum wait time (AWT and MWT)
Agent Inbound Stats
The Agent Inbound Stats module shows current details for each agent.
The following information are displayed for each agent:
 Agent Inbound Stats
- Agent Name
- Agent ID
- Number of Calls
- Talk Time(Avg/Total)
- Idle Time (Avg/Total)
- Logged In Time
- Not Ready Time
- Not Ready Counts
- Login Countsinformation
Queue Calls
The QUEUE CALLS module shows all of the incoming calls all queues that the supervisor has permissions to monitor.
For each call, the user can see the following information:


Queue Calls
- Call ID
- Queue Name
- Queue Number
- Caller ID
- State
- Time in State
- Position in Queue
- Estimated Answer Time
The supervisor can preform the following operations for each call if he/she has the permissions to do so:
- Transfer Call
- Take Call
- Spy Call
Inbound Calls
The INBOUND CALLS module shows all calls coming into the system with relevant information about the call.
For each call, the user can see the following information:
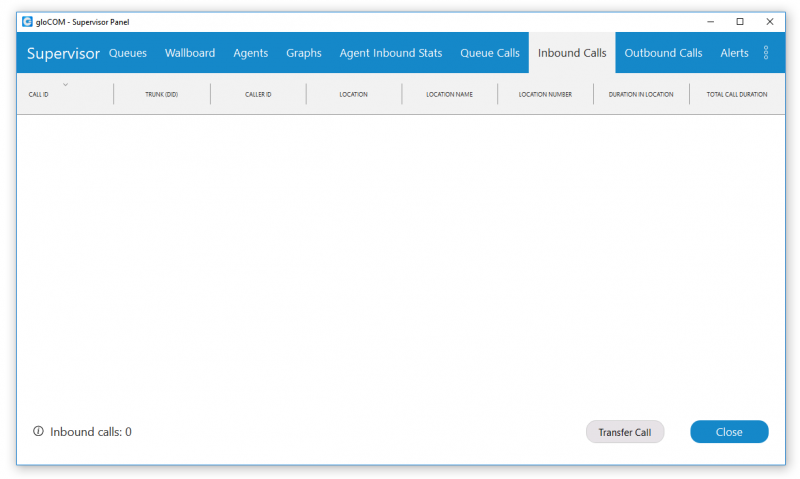 Inbound Calls
- Unique call ID
- Trunk from which the call came in
- Caller ID
- Location: the current location of the call (IVR, Queue, Conference etc…)
- Location Name
- Location Number
- Duration in Location (when did the call entered it’s current location, i.e. queue, ivr, conference…)
- Total call duration (from when the call came into the system)
The supervisor can perform the following operations for each call if he has the permissions to do so:
- Transfer Call
Outbound Calls
The OUTBOUND CALLS module shows all calls going out from the system. Users can see who made the call (extension/name/agent) and to what number the call was placed. The supervisor can also see the duration of the call.
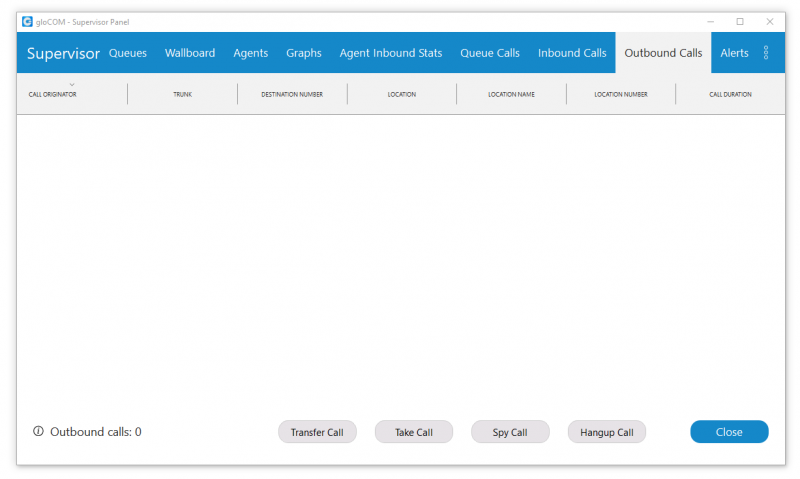 Outbound Calls
The supervisor can perform the following operations for each call if he has the permissions to do so:
- Transfer call
- Take call (transfer it to his own extension)
- Spy the call
- Hang up the call
Alerts
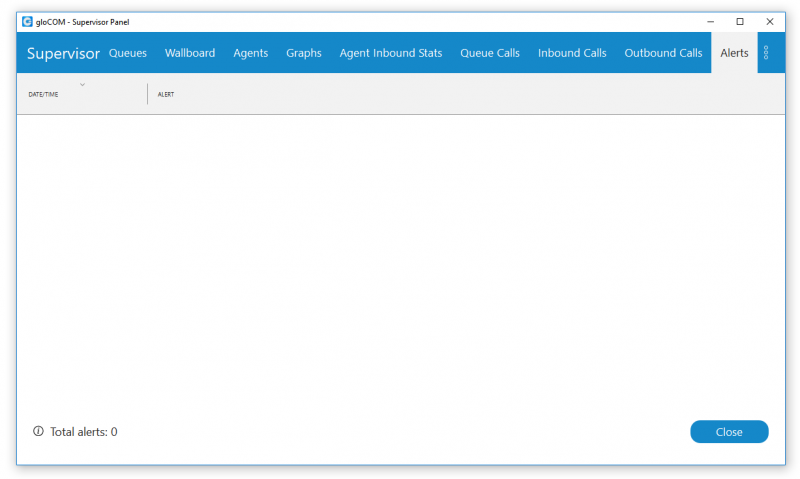 Alerts
The ALERTS MODULE shows all alerts that the user has selected in the Preferences.
Camera
- Surveillance Camera
- Opens up a Surveillance Camera preview. This option will work only if you have your surveillance camera set up in the IP address in Communicator –> Preferences –> Video –> Surveillance Camera.
Online self care
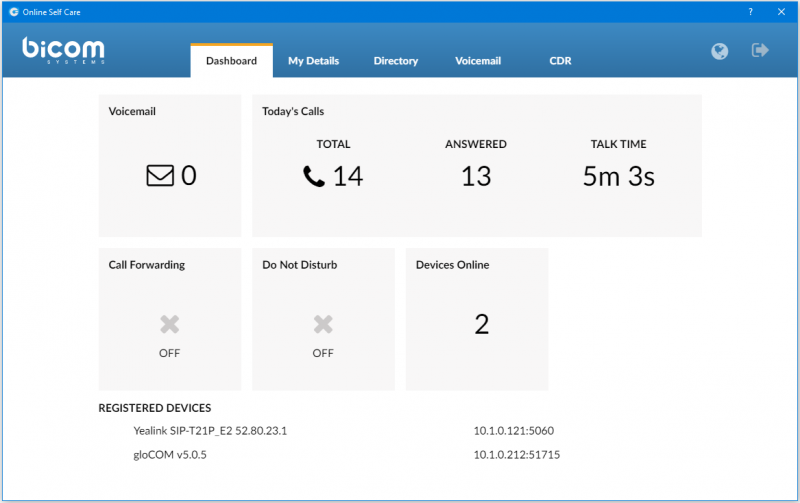 Online Self Care
In order to login to Online Self Care, point your browser to: http://$IPADDRESS/ (For Example: http://192.168.1.1/). When you click on the Communicator OSC icon, you are automatically directed to your OSC page.
- Email: The email address assigned to the extension
- (ex. The provided email address is used as a username for logging into Online Self Care
- (e.g. email@example.com))
- ([a-z] [0-9] [@_.-])
- Password/PIN: The user password assigned to the extension
- (ex. This field accepts your Communicator password (e.g.n9h*Caq1Icr))
- ([0-9])
Quick List
 Quick List
Quick list buttons enable a quick overview of Communicator, Contacts, Favorites, and Recent tabs.
- Communicator – Displays a list of all Communicator contacts.
- Contacts – Displays a list of all saved and imported contacts.
- Favorites – Displays all contacts that you marked as a favorite.
- History – Displays log of all recent missed, received, and dialed.
Menu
File Menu
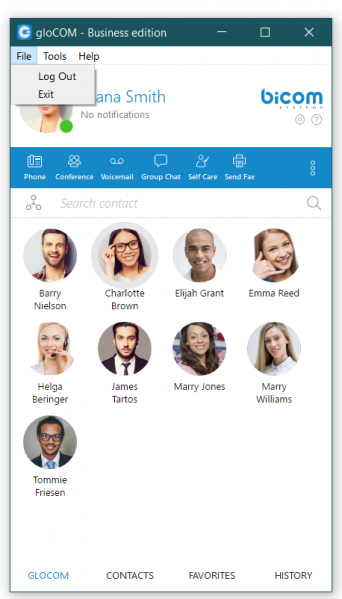 File Menu
- Log Out
- Click on Log Out to log out from active connection(s).
- Exit
- Click on Exit button to log out from active connection(s) and close Communicator application.
View
 View Menu
1. Chat History
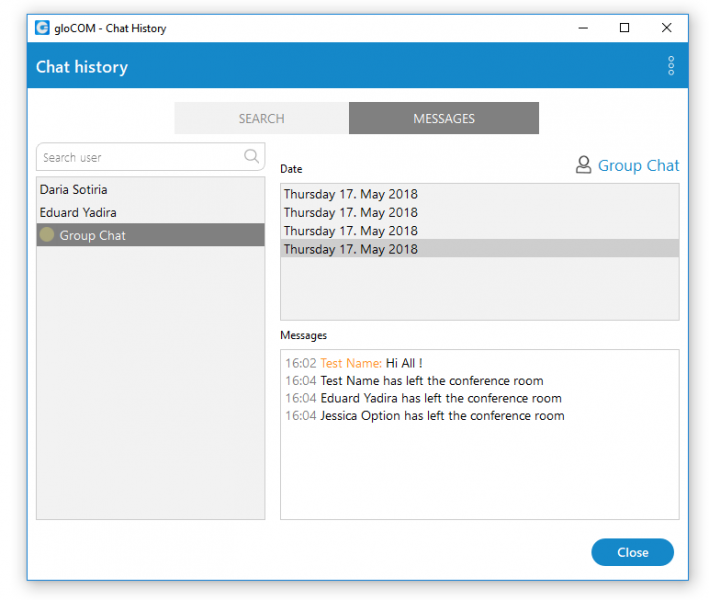 Chat History window
- Shows a history of chat conversation with your contacts.
- Users (field)
- List of all contacts the user chatted with.
- Message (tab)
- Displays chat history per date.
- Delete (button)
- Click on the Delete button to delete the selected chat conversation.
- Delete All (button)
- Click on the Delete All button to delete all chat conversations with selected contact.
- Search (tab)
- Users can use the Chat History Search feature to search for a term in the search history.
- Search for (field)
- Enter a term to be searched.
- User (select box)
- Select one particular or all users from the list.
- Date (select box)
- Choose any or a specific date for your search.
2. Departments
- Show a list of company departments at the bottom of the Communicator window.
In Communicator 5.3 “My departments” is a new feature in main window departments dropdown list. This way a user can choose to show only users from his departments. Also, login notifications are now shown only for users that are visible in contacts view (users from the selected department). That means if “All departments” option is selected, login notifications are shown for all users, but for example, if “Accounting” department is selected, only login notifications from those users are shown.
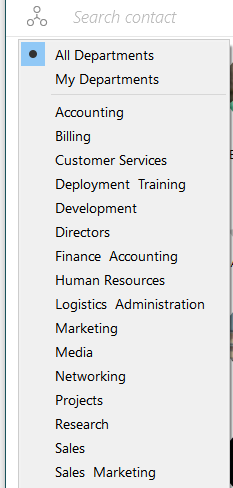 Departments
3. Received faxes
- Inbound Fax Documents
4. Contacts
- You can choose the Communicator users list layout. Choose between Large Icons, Small Icons, and Grid View.
5. Diagnostic logs
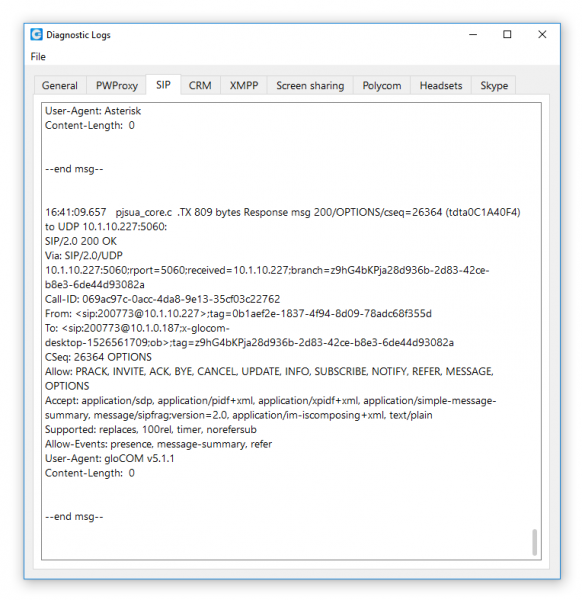 Diagnostic Logs
- Here you can see diagnostic logs with the level of verbosity that you have set in Preferences->General->Diagnostic Logs.
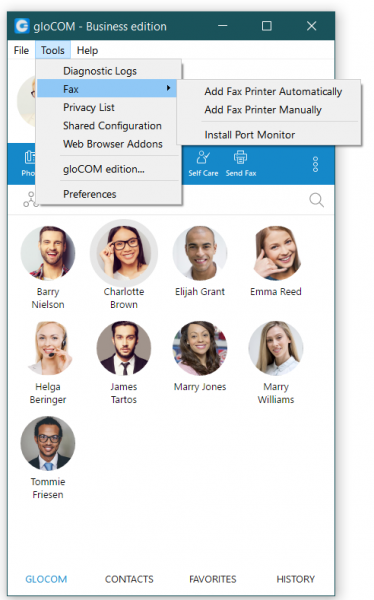
Tools Menu
 Tools Menu
- Fax
- Add Fax Printer Automatically
- Add Fax Printer Manually
- Install Port Monitor
- Web browser add-ons…
- Click on Download web browser add-ons to add the browser add-on which will allow the user to select and dial a phone number directly from a web page. Supported browsers: Internet Explorer, FireFox, Safari, and Chrome.
- Communicator edition…
- Change the Communicator edition.
- Changing Communicator editions is not possible in case if “Shared configuration” is enabled.
409px-5.-shared-configuration-business.png”>Shared Configuration
- Shared configuration
- Enable:
- By enabling shared configuration, all users on this computer will share same Login account, phone mode and edition.
- Account:
- E-mail: email address is displayed in this field.
- Password: in case that option “Enable” is unchecked, password will be hidden. After you check “Enable” option, option “Show Password” will be functional.
- Login Server: Shows IP address of server.
- SIP proxy (optional): this field is optional.
- Edition: In this option select edition for your Communicator. Current edition is displayed, but possibility to choose between other editions is given.
- Phones
- Choose which phones you want to use:
- Softphone: choose to use Softphone.
- Deskphone: choose to use Deskphone.
- Polycom: choose to use Polycom phone.
- Polycom IP:
- In case that user chose Polycom, in this option user needs to provide IP address of Polycom phone.
- Preferences
- Click on Preferences to open Communicator settings. For more about preferences, please visit the Preferences chapter.
Contacts Menu
 Hide non-Communicator users
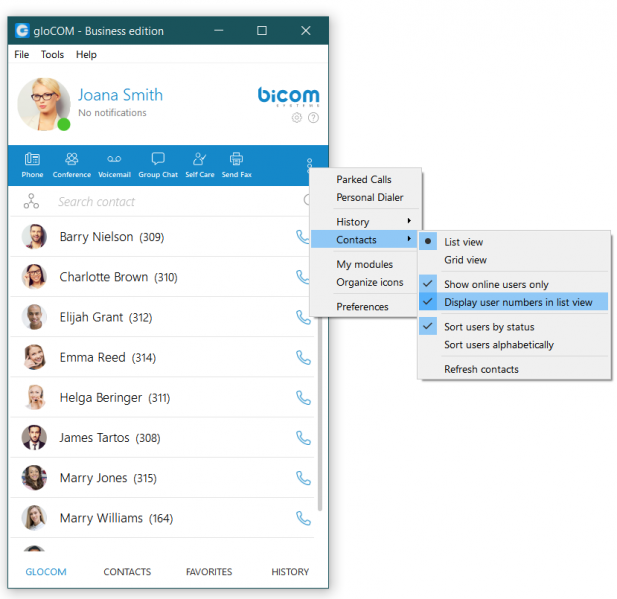 Additional Contacts Features
- Sort contacts by status
- Click to sort contacts according to status.
- Sort contacts alphabetically
- Click to sort all contacts in alphabetical order.
- Show only Online users
- Click to display only users that are online at the time.
- Privacy List
- Click on the Privacy List to view blocked and hidden users.
- –Blocked users
- When you block a user, he or she cannot see you ‘Online’ and cannot send messages to you.
- –Hidden users
- When you hide a user, he will not be in your list of your contacts, but you will be able to search for him.
- Hide non-Communicator users (extensions).
- Enable/disable non-Communicator extensions from displaying in contacts. Managed from PBXware GUI, for every extension default is YES.
- Show / hide numbers next to contact name in Communicator
- Only available in List view, in grid view contact number is shown as tooltip on mouse over.
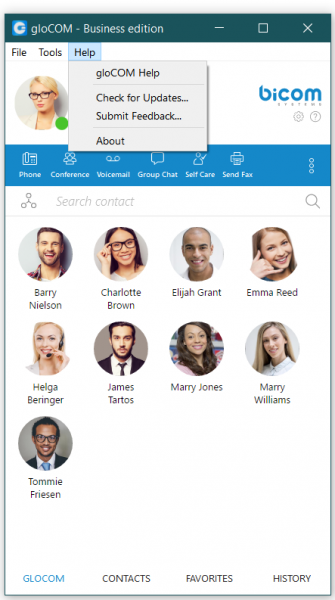
Help
 Help Menu
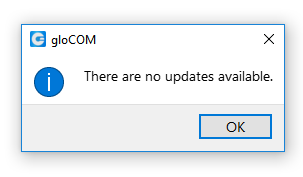 Communicator is Up-to-date
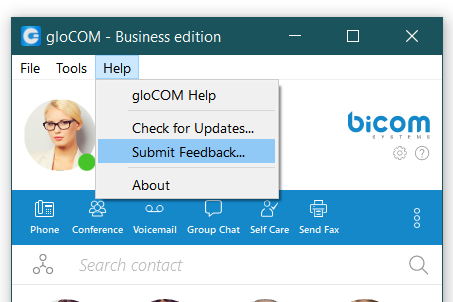 Submit Feedback
 About Communicator
1. Communicator Help
- Redirect to our official website www.bicomsystems.com
- Additional documentation and guides are available on our official website: www.bicomsystems.com. If you still have any questions, please feel free to contact our support department.
2. Check for updates
- Check online for official product updates.
- If there are updates available, the software will apply them automatically. If your software is up to date, you will receive a message as stated above.
3. Submit Feedback
- User can now easily send feedback from the “Help > Submit Feedback…”
4. About
- Communicator 5.3 About dialog contain information regarding application version, revision, PBX information, libraries, and other important information. Users can easily access/copy and paste info for support if needed.
Added automatic crash report system.
When Communicator crashes, the user has the option to send a crash report for developers to analyze the issue and solve the problem.
Preferences
General
 Preferences
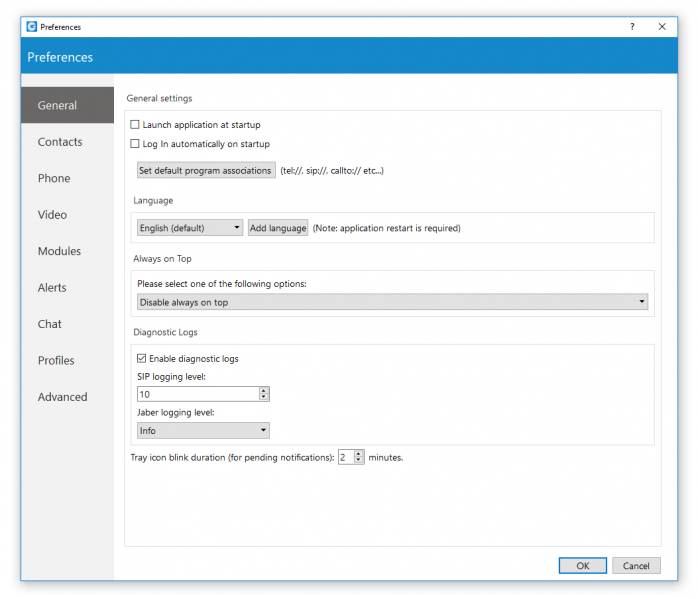
General settings
To start click on the Settings icon inside toolbar. Inside the General Settings section, checking the box next to “Launch application at startup” will start the application when your operating
system starts, while checking the “Log in automatically on startup” will log the user in automatically every time the application is launched. Depending on your Operating System,
the “Set default program associations” button will allow you to choose which protocols application will open by default (tel://, sip://, callto://, etc.).
From the drop-down menu you can select the language and if you have your own language file you can add it by clicking the Add language button, then select the language that you wish to add from a list and then choose your language file. You will need to restart the application for language change to take effect. In Communicator 5.3 two more languages are included, French and Italian.
Under the Always on Top section you can choose whether you would like to have call or call and contacts window always on top or if you wish to disable the always on top option. This
feature will keep the Communicator window on top even if another window, e.g., web browser window is selected.
You can turn on or off diagnostic logs by checking the box next to it. When turned on, Communicator will store all logs on your computer/machine. You can specify how much data/information you
want to store by editing SIP and Jabber logging levels. By default the SIP level is set at 3.
Depending on the situation you can choose between 1 to 10 levels where Level 1 would store the least amount of information and Level 10 would store all information. There are 4 logging
levels for Jabber. Error is the first level and will store only errors, each next level includes all previous levels.
e.g., Warning will include warnings and errors, Info will include info, warnings, and errors,… and debug will include all of them.
Below the Jabber settings, you can set for how long the Communicator tray icon will blink while you have notifications pending such as missed calls or unread messages.
Contacts
 Users
Users Warning icon
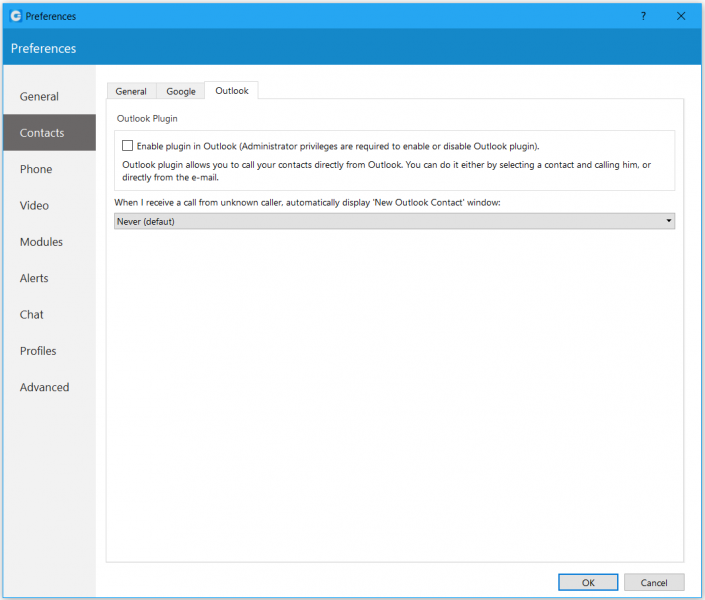
To start click on the Settings icon inside toolbar, and navigate to the Contacts settings section. At the top you have 3 tabs: General, Google, and Outlook.
Under the Online users section you can enable or disable the option to display only online users, as well as set conditions when a user is considered to be online, e.g., if online on IM and Phone is set, the user will be considered online if he or she is available for both chat and phone calls.
Next option, if Online on IM or Phone options is selected, user will be considered online if user is available for either chat or phone calls. Online on IM will consider the user to be online if the user is available for chat – and Online on phone will consider the user to be online if the user is available for phone calls.
Under the “Default contact double-click action” you can set what action will be initiated when the user double-clicks on a contact. If chat is selected then a chat window with contacts will open, and if call is selected then double clicking the contact will call the contact. If you wish to sync your contacts daily, check the box next to “Sync my contacts daily”.
Next go to the Google tab. Here you can choose to integrate your google account contacts with Communicator. Simply check the “Enable Google contacts integration”, enter your Google email and password, and your Google contacts will sync automatically.
Outlook Plugin with Communicator navigate to the Outlook tab and check the “Enable Plugin in Outlook” Contacts box. This will enable you to initiate calls directly from Outlook.
Communicator automatically syncs your Outlook contacts. (When I receive a call from an unknown caller, automatically display the “new Outlook contact” window) option, when turned on, it will open a new Outlook contact form every time you receive a call on Communicator from a number that is not on your contacts list.
NOTE: Users can control if Outlook’s add new contact windows shows up on Call started, answered or finished.
If loading of contacts has failed for whatever reason, we currently display a warning icon which is fine. But the user should be able to click it and application to ask “do you want to retry?” Instead of opening the 3 dots menu in the modules bar, and finding the option “refresh contacts”
Phone
 Phone
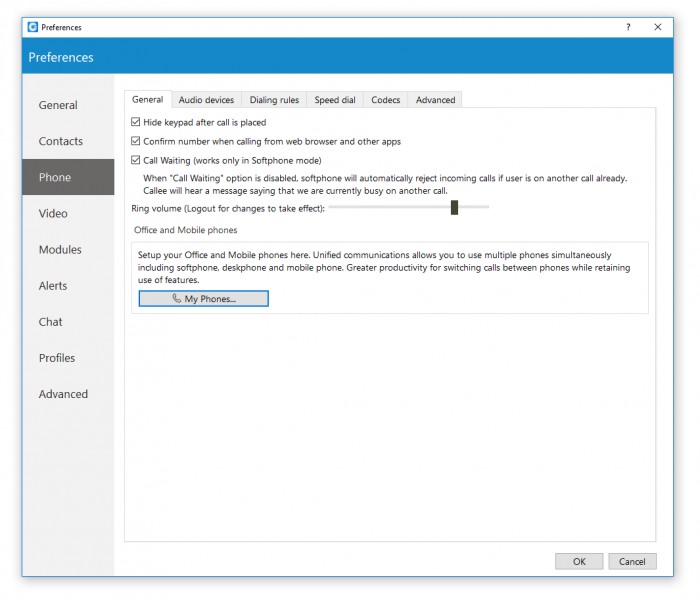
PhoneTo start click on the Settings icon inside toolbar, and navigate to the Phone Settings section.
Under the General tab, check “hide the keypad after a call is placed” to minimize the Keypad once the call has been placed. When turned on, “Confirm the Number when calling from web browser and other apps” will ask you to confirm the number and will also give you an option to make corrections if necessary. Use the ring Volume slider to adjust the ring volume.
You will need to restart the application for changes to take effect. “My phones…” button allows you setup your deskphone, softphone, and add a mobile number.
Inside the “Audio Devices” tab, you can set input, output and ringtone device. It is recommended to leave these settings at default values.
Check “Enable Plantronics headset support” option in order to integrate a Plantronics headset with Communicator. This will enable the use of Plantronics headset buttons such as answer, hold, transfer…
The same applies for Jabra headsets. Turn on “Enable Jabra headset support” option, in order to integrate a Jabra headset with Communicator. Inside the “Dialing rules tab” you can set rules for outbound calls. e.g., If you enter 061 under “text to replace” and under “replacement text” you enter 0038761, Communicator will replace every phone number that has “061” with “0038761”. However, sometimes you would only want to replace numbers that begin with 061, and not the ones ending in 061…
We have implemented Sennheiser call control integration. Integration can be enabled inside Preferences > Phone > Audio devices > Sennheiser tab.
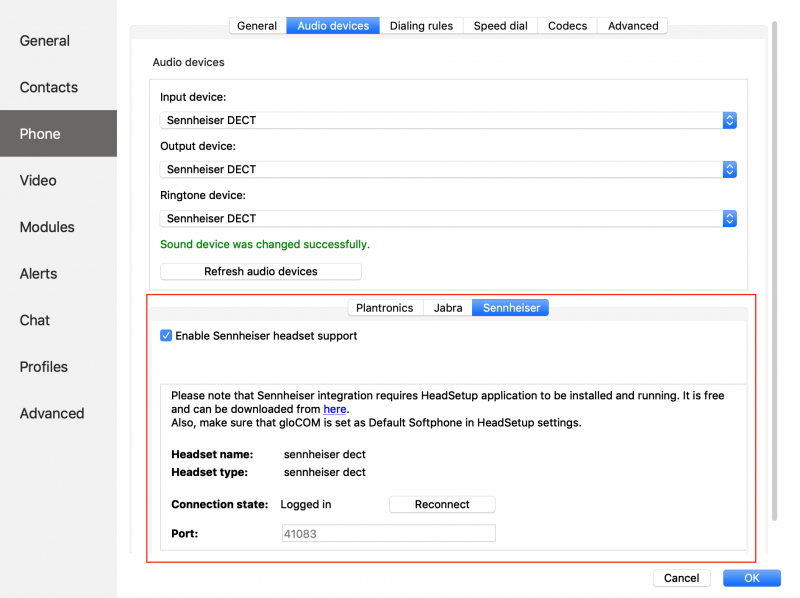
Supported features on the headset (HS):
• Incoming call accepted by HS (tap call button while there is an incoming unanswered call)
• End active call from HS (tap call button while there is an active call)
• Incoming call rejected by HS (LONG press call button) (not supported for DECT devices)
• Hold active call on HS (double tap call button while an active call is not held)
• Resume held call on HS (double tap call button while an active call is held)
• Redial call (double tap call button while there are no calls)
• Off-hook (tap call button while there are no calls)
• On-hook (tap call button after off-hook event)
• Mute from HS (tap the mute button while on active call)
• Unmute from HS (tap the mute button while muted on active call)
If connection to HeadSetup (or HeadSetup Pro) is lost, Communicator 5.3 will try to reconnect every 30
seconds. Logs are written in Headsets tab inside Diagnostic Logs.
For a more precise replacement you can use regular expressions. For example, if you enter 061{6}/d under text replacement, and “0038761/1” under replacement text and you turn regular expressions on, this will replace 061 digits of every number that begins with 061 and has 6 more digits with 0038761 followed by those 6 digits. E.g. 061-123-456 would be replaced with 0038761-123-456.
Enabling “Detect and format USA and UK phone numbers for outbound calls” option will auto detect and format your local USA&UK numbers so that they can go through the system. This may cause problems in some countries so be careful when using this feature.
Inside the Speed Dial tab click on the Add button and from a drop-down menu and choose a number from 1 to 99, and in the field next to it assign the phone number that you want to Speed dial. For example , dialing #7 will dial 061-123-456 To edit an existing speed dial number select the number from the list and click the Edit button or press Remove to remove the number.
Inside the Codecs tab select the codecs that you wish to use. Some codecs offer higher quality but take more bandwidth, some offer better compression so they are less heavy on network resources, depending on your needs you might want to turn some codecs on or off, and if you have more than one codec you can sort them by priority using the up and down arrows on the right.
Inside the Advanced tab, you can choose to turn the encryption on or off for voice and video calls, or you can select “Use the settings from server” to use the settings that your admin has set.
Under the Register field you can set how often Communicator will send SIP register to the SIP Server or voip provider to let it know where it is. It is recommended to leave local sip port empty to allow SIP Protocol to use any port available. However, if you wish to restrict SIP (outgoing) traffic to a specific port you can enter the port number here.
Check the “Send keep alives” option to send SIP keep-alives to the server.
Check the “Enable QoS” to enable Quality of Service feature. QoS is a set of technologies that work on a network to guarantee its ability to dependably run high-priority applications and traffic under limited network capacity (must be supported by user network).
Call waiting added as a new feature in softphone mode:
When “Call Waiting ” option is disabled , softphone will automatically reject incoming calls if user is on another call already.
Callee will hear a message saying that user is currently busy on another call.
Video
 Video Quality
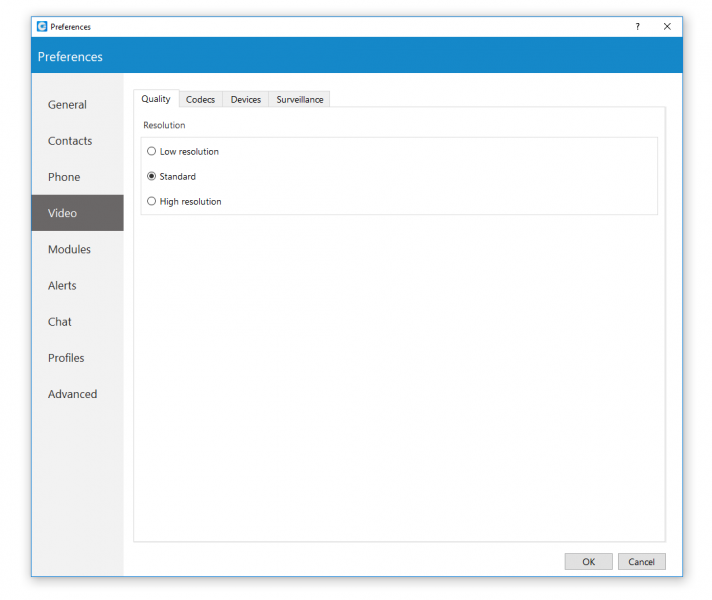
Video Settings section is divided into 4 tabs. Inside the Quality tab, you can set the resolution of the video call. You should adjust these settings based on the quality of your network connection.
For example: If your bandwidth is low or you are experiencing temporary network issues, you can set the video quality to Low resolution to get better video call performance. Inside the Codecs tab, you can enable or disable video codecs, and if you have more than one codec you can sort them by priority using the up and down arrows on the right.
Under Advanced codecs settings you can adjust how much compression the codecs will use. The higher the bitrate the less compression codecs will use, which directly relates to a better video quality but also larger files. Use default values for codecs if you are not familiar with video codecs.
Inside the Devices tab you can select the video capture device. e.g., if you have a laptop with an integrated web camera, and you connect another web camera to your laptop, you can specify which camera Communicator will use for video call from a drop-down menu.
Next, inside the surveillance camera tab you can enable or disable surveillance camera and choose if the surveillance camera video should always stay on top even if another window is selected.
Under the URL field, enter the url of your IP surveillance camera stream.
NOTE: Please be aware that only MJEPG stream over HTTP is supported at the moment.
Modules
 Modules
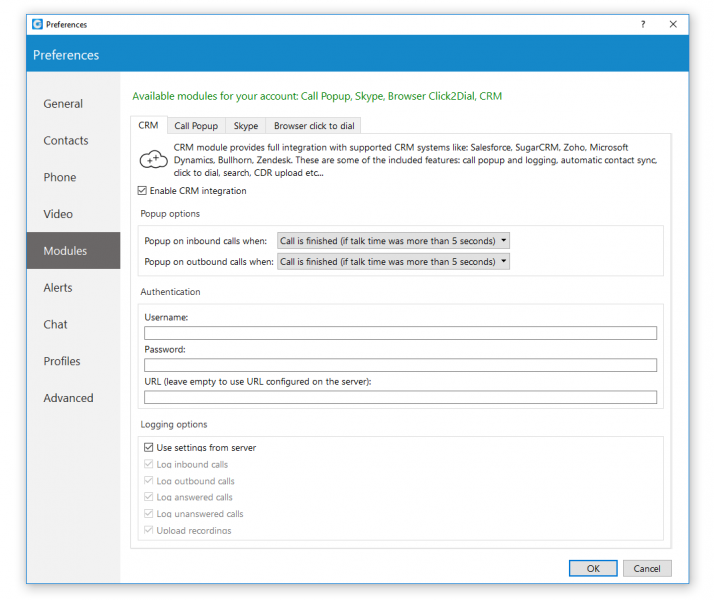
Communicator is compatible with several Customer Relationship Management solutions, such as Salesforce, SugarCRM, Zoho, Zendesk, MS Dynamics, and Bullhorn.
To enable CRM integration with Communicator, click on the Settings icon, navigate to the CRM section and check the box next to “Enable CRM integration”. Under the “Popup Options” you can set when a page with customer information should open. You can have it open when you answer the call, or immediately when your phone starts ringing, before you even answer, and you can choose not to have the customer page open at all on incoming calls.
On outbound calls, you can have it pop up when the call is initiated or when the call is answered, and same as with incoming calls – you can disable it by selecting Never.
Under Authentication you can enter account details for your CRM. Each CRM is different and requires you to enter a security token, password or a combination of both.
Next, under logging options, you can specify which information you want to log… or you can choose to log information that your admin has set by selecting “Use the settings from the server” option.
Call Popup Settings, call popup module can be used to push the call details to browser-driven third-party software. You can set the call popup to open when call has started, when call has been answered and/or when call has finished. For each setting you can specify to enable it for inbound and/or outbound calls, and you can turn on silent mode. In the silent mode, a URL request will silently be sent to the server, meaning it will not open a web browser.
Call popup is macro based. In the URL field the following macros can be used: callerid, callerid name, extension, duration, call id, direction, queue number and queue name.
e.g., In Call started URL field you could enter “yourcrm.com/calls?id=%callerid%” and check the inbound calls bellow. Now, whenever you receive a call from customer call popup will open a web browser and will write the customer’s phone number.
You can send all these information silently to your CRM server and create reports such as how many inbound calls you have received, how many outbound calls you have made, average call duration etc.
NOTE: Specify EXE file, APP in MacOS, or URL that will be executed in Call Popup module.
Alerts
 Alerts
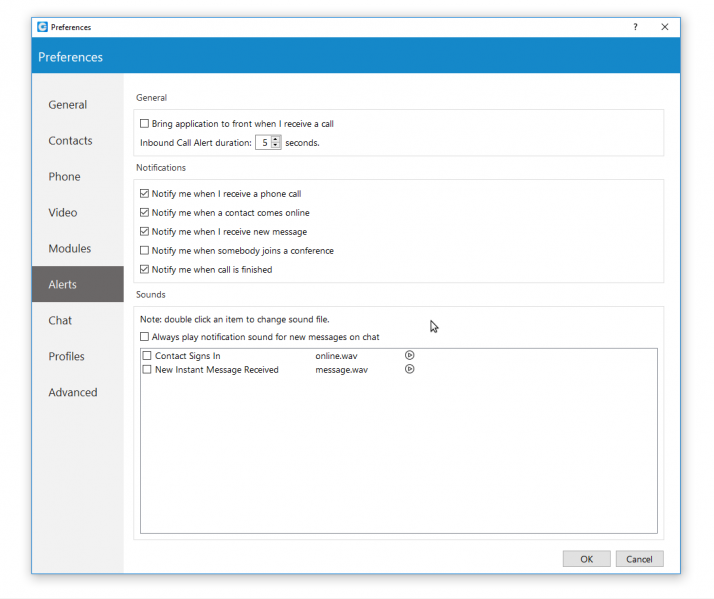
To start click on the Settings icon inside toolbar and navigate to the Alerts section.
Check the “bring application to front when I receive a call” option to bring Communicator to front whenever someone calls you. You might not want to have your work interrupted by call alerts, in that case you can uncheck this option.
You will still be able to receive the calls, however, you will have to navigate to the application yourself.
Inbound Call Alert duration can be set between 5 and 15 seconds. This option controls the duration of a small notification window that pops up in lower right corner of the screen whenever you receive a call.
To turn off inbound call alert completely, simply uncheck the “Notify me when I receive a phone call” option. You can also set to receive notifications when a contact comes online, when you receive a new message, when somebody joins a conference and or when call is finished.
Only the duration of the call alert notification can be adjusted, all other notifications have a fixed duration of 5 seconds.
Under the Sounds section, you can choose to turn sound notifications on or off for contact sign in and or for new chat messages. If you select “Always play notification sound for new messages”, you will hear a sound notification for every message received, even if you have a chat window currently open.
For this feature to work the “New instant message received” option has to be selected as well, otherwise you will hear no sound.
To preview a sound, click on the play button on the right, and if you wish to change a sound, double-click an item and select the sound file you wish to use. Please note that only .wav files are supported.
Chat
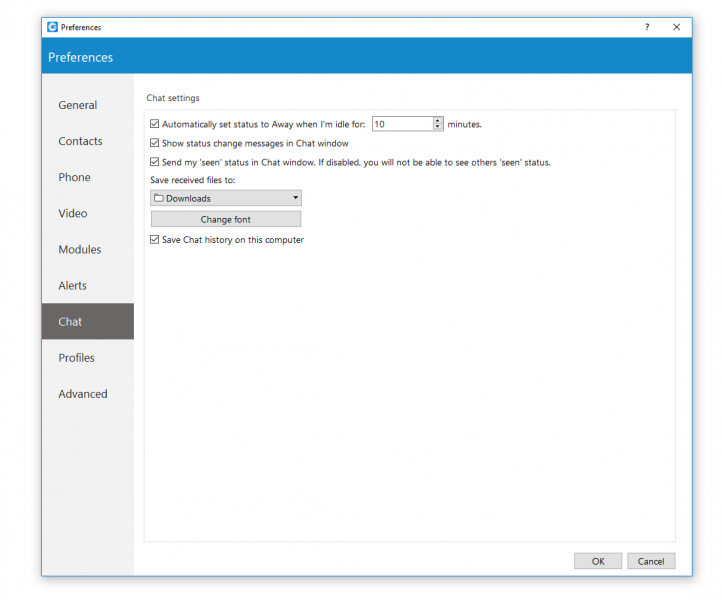 Chat
ChatTo start click on the Settings icon inside toolbar, and navigate to the Chat section. If you want Communicator to change your online status to Away when there is no user activity for a certain period of time, enable the “Automatically set status to Away when I am idle option”, and set the time anywhere between 1 and 60 minutes.
For example, if you set it to 10 minutes, and there is no user activity on the computer, Communicator will change your current status to away after 10 minutes have passed. As soon as the Communicator register any user activity it will change from
away status to your previous status. This option does not work if you have set your status to offline.
“Show status change message in chat window option”, if checked, will display status change message in every active chat window.
If you enable the “send my seen status” option, you will be able to see when someone has read your message, and vice versa, other users will be able to see when you have read the message they have sent you. If you disable this option, you will not be able to see when someone has read your message nor will other users be able to see when you have read messages they have sent you.
Below the “Save received files” click on the drop-down menu and choose Other to specify the location where Communicator will save received files. And under the “Change font” menu you can choose the default font for chat layout.
To save all your chat history on your computer, check the box next to “Save Chat history on this computer”.
Profiles
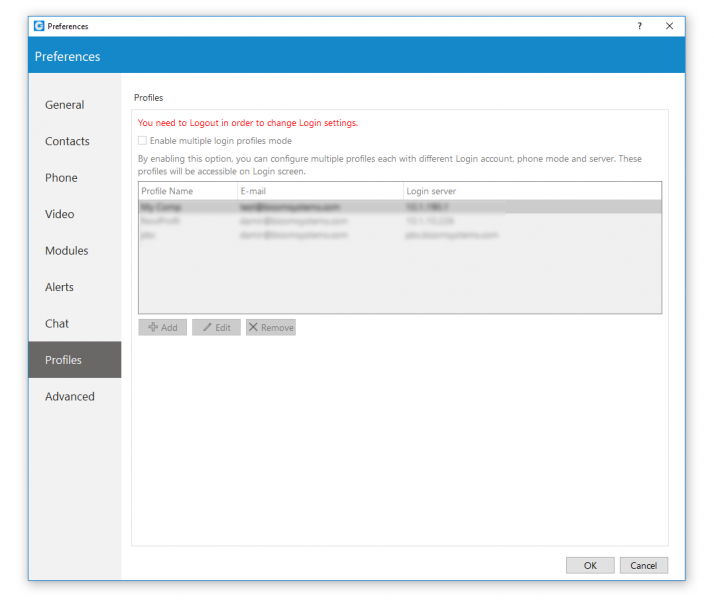 Profiles
To enable profiles click on the “Enable multiple login profiles mode”.
With this option enabled you can add, edit or remove an existing profile.
To add a profile click the Add button, follow the setup wizard, enter the profile name, enter your Communicator email and password, and under the Advanced tab enter the server address, and if needed specify the SIP proxy as well. When done click Next to continue.
Adjust the phone settings to your preference and click Next, review your information once more and click Finish to create a profile. Once created you can edit the profile by selecting it from the list, and clicking the Edit button or you can remove selected profile by clicking the Remove button.
To log in with your newly created profile on the Communicator login screen, from a profile drop-down menu select your profile and click on the Login button.
Advanced
In the Advanced menu you can change the Polycom listening port to suit requirements of your Polycom phone.
The default port is set to 10983 which can be changed by clicking inside the box and entering your listening port number.
Skype for Business Module
 Skype for Business Module
 Click to Dial
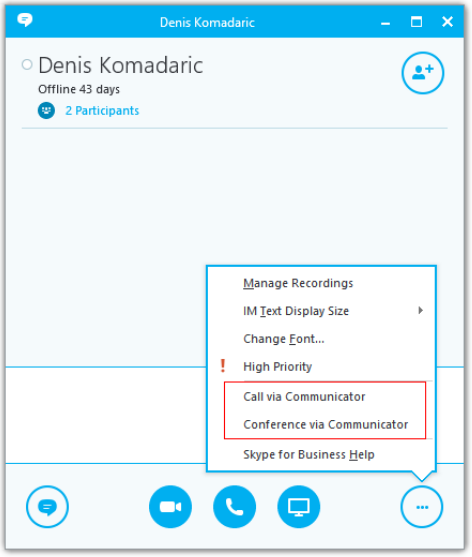 Click to Dial
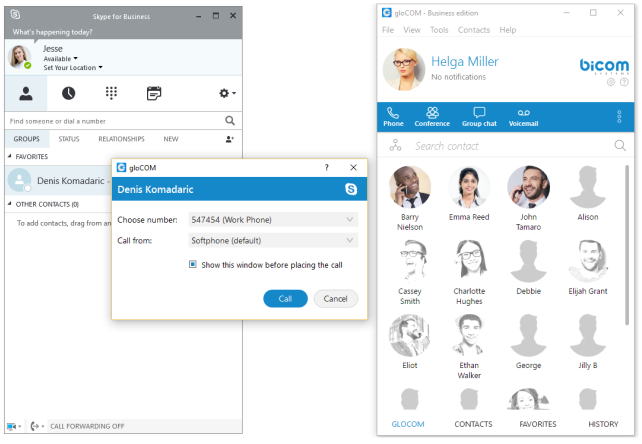 Click to Dial
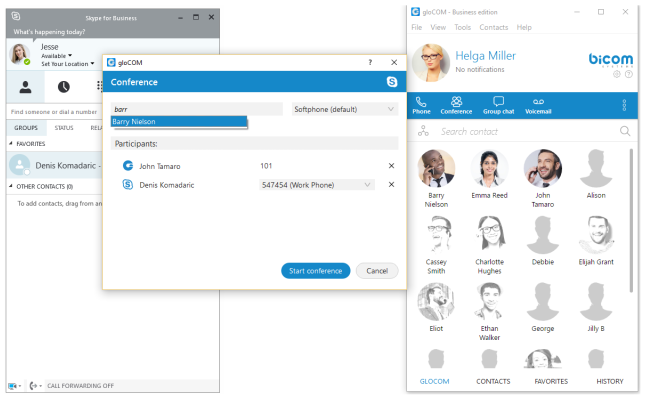 Conferencing
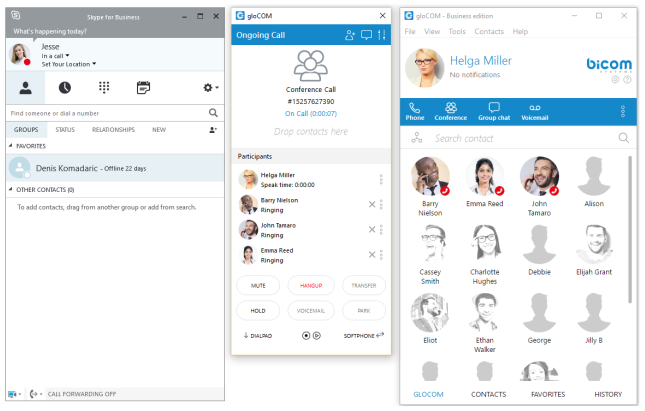 Conferencing
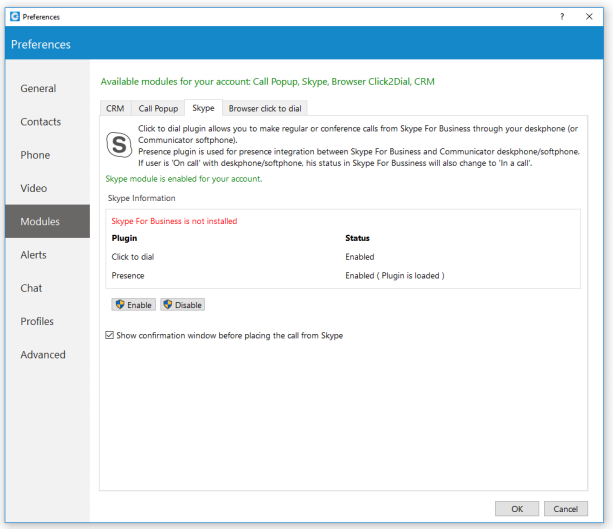 Settings
Skype For Business module is used for integration between Skype For Business and Communicator. The idea behind this module is to provide integration between Skype For Business client and user’s phone system (PBXware).
It consists of four parts:
- Presence
- Click to dial
- Conferencing
- Control of ANY SIP deskphone/softphone/mobile device registered on the PBXware telephony platform from the PC
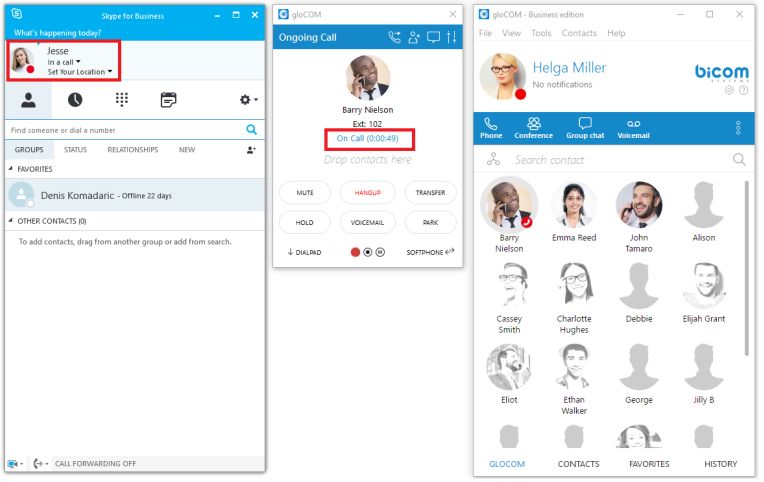
Presence
Whenever a user is on a call with ANY of their devices, including deskphone, softphone or mobile phone, Skype For Business will change its presence automatically, and other Skype users will see this presence as “On a call”. Once the call is completed, Skype presence will revert back to the previous state.
NOTE: Red marked squares are showing status change inside Skype for Business.
Click to Dial
The click to dial plugin allows you to make regular or conference calls from Skype For Business using PBXware phone system. It allows the user to use ANY of their devices to make the call through their Phone System.
This includes: deskphone, softphone and mobile phone. The user can even make a call from Skype with a single click through the mobile network (GSM) and Skype will still show its status as “On Call” until user hangs up on GSM. When click to dial plugin is enabled, two options appear in Skype For Business: “Call via Communicator” and “Conference via Communicator”.
When we click on the “Call via Communicator” option, a dialogue appears, as seen in the next image. We have to choose the contact number that we want to call and the device from which we want to make a call. Only one Skype For Business contact can be selected if we want to use this option. If check box below “Show this window before placing a call” is selected, every time we are placing a call from Skype for Business this windows will popup (this can be changed in preferences). Once we press “Call”, the call will be placed, in this case using our deskphone.
Conferencing
We can also invite Communicator contacts in this conference. We add them by typing their name or number into search field where we can also enter any other number we want, and then press “Enter”. [X] button is used to remove contact/number from the list of users that we want to invite to the conference.
Once we press “Start Conference”, an audio bridge will be automatically created on the PBX, and all the invitees will join automatically. We will join on our deskphone in this example.
Although the call is in progress on our deskphone, we can see and control this audio conference on the PC in the Communicator app, as displayed in the next image.
Settings
If we want to enable/disable Skype For Business module plugins for all Communicator users on one computer, we need to navigate to Preferences > Modules > Skype. After we enable/disable Skype For Business module plugins, we have to restart the Skype For Business application in order to apply the changes made. Even if these plugins are enabled, we can use them only if the logged user has Skype For Business module enabled by supplier.