For iOS, connection to the SIP server has to be made over TCP or TLS protocols, can not be made over UDP. Reason for this is that, iOS app can not have VOIP services enabled in background mode unless they are made over TCP or TLS protocols.
There are two things that need to be done:
- Your pwproxy server (PBXWare) must be configured so it enables TCP connections. Navigate to PBXWare -> Settings -> Select your server/tenant -> Protocols, then Enable TCP set to “Yes” or for TLS, Enable TLS set to “Yes”.
- NOTE: Sometimes, on some servers, not even with TCP enabled is not going to work. It works only when TLS protocol is enabled. This does not mean that extension has to have TLS protocol enabled.
- All extensions that are going to be used on Communicator Go for iOS devices have to have TCP enabled. Navigate to PBXWare -> Select a server/tenant -> Extensions-> Advanced Options -> under Network Related, enable TCP or TLS.
Contents
Login Setup
In Communicator Go, Login Setup contains several parts:
- Login (normal)
- Advanced Login
- First Time Login
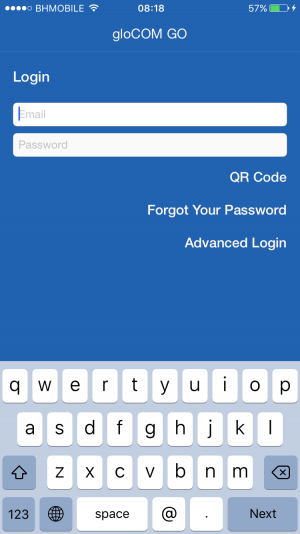
Login
Login Screen appears:
- When app is freshly installed,
- User has Sign Out from app before
- User’s credentials had changed
When Login Screen is shown:
- Email field is empty, focused and enabled.
- Password field is empty and disabled.
- Email field is focused.
- Keyboard is shown with layout for email address and Next button.
- Action buttons:
- QR Code
- Forgot Your Password
- Advanced Login
Email Address Validation
- When Next button on keyboard is pressed, email validation is done.
- If email is valid and domain from email represents domain of your server, *Password field will be focused and enabled to enter, Next button on keyboard is changed to Done.
- If email is not valid alert message will show with title “Login Error” and appropriate message.
- If domain part of email address is not your server domain, message to enter your host address manually will be shown, with option “Enter”. Pressing Enter will present Advanced Login Screen (section 2.).
Password Validation
- When password is in focus keyboard with Done button is shown.
- While entering password its value is secured (*******).
- If password is valid:
-
- a. Communicator Go starts (section 2.).
- b. First Time Login Screen is presented (section 1.3, image 3.).
- If password is not valid, alert message is shown with appropriate message.
QR Code
- When QR Code button is clicked:
-
- a. First time running app, user will be asked for Camera permission. Permission should be granted to enable QR Code scanning.
- b.Camera will be run, in right corner of Navigation Bar, Close button will be shown, when clicked closes camera.
- After QR Code is scanned Email and Password fields are filled with corresponding data.
- Pressing Next and Done buttons on keyboard, email (1.1.1.) and password (1.1.2.) validations are done.
Forgot Your Password
- When Forgot Your Password button is clicked:
-
- a. If Email field is entered with valid email address, user will get message that an email with the link to his new password is sent to his email.
- b. If email field is empty, user will get Password Recovery Prompt to enter host and email address.
- i. If valid host and email are not entered, appropriate message will be shown
- ii. If valid host and email are entered, user will get message that an email with the link to his new password is sent to his email.
Advanced Login
When Advanced Login button is clicked, Advanced Login Screen will be presented (section 1.2.).
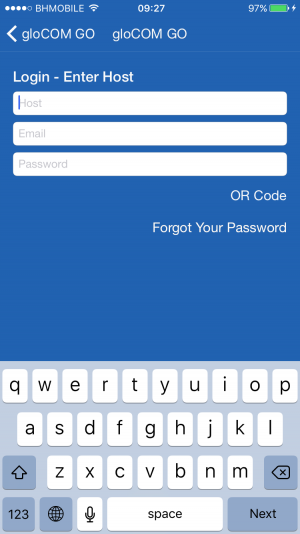
Advanced Login
This screen appears when:
- Enter is pressed from “Login Error” Alert Message.
- Advanced Login Button is pressed.
When Advanced Login Screen is presented:
- Host field is empty, focused and enabled.
- Email field is empty and enabled.
- Password field is empty and disabled.
- Keyboard with Next button is shown.
- In Navigation Bar, on far Left Back button is shown.
- Action buttons are show:
-
- a. QR Code
- b. Forgot Your Password
Host Validation
- When Next button on keyboard is pressed host validation is done.
- If host is valid, Email field is focused.
- If host is not valid, alert message with Login Error and appropriate message is shown.
Email Validation
- When Email is focused, Next button on keyboard is shown.
- When Next button on keyboard is pressed, email validation is done.
- If email is valid, Password field will be focused and enabled to enter and Next button on keyboard will be changed to Done.
- If email is not valid alert message will show with title “Login Error” and appropriate message.
Password Validation
Same as section 1.3
QR Code
Same as section 1.4
Forgot Your Password
Same as section 1.5
Back Button
In Navigation Bar, on far left, Back button is located.
When clicked returns to Login, section 1.1.
First time login
This screens appears:
- When user is logging in for the first time, with his credentials to the system (pwproxy server – PBXWare).
- User’s password was reseted by the system or administrator.
Image 3. – First Time Login Screen
When First Time Login Screen is presented:
- Emai field filled and disabled, can not be changed.
- New Password field empty, focused and enabled.
- Confirm Password field empty and enabled.
- Password strength indicator hidden (below horizontal white line).
This field is disabled for editing on this screen.
New Password Validation
- While entering new password its value is secured (*******).
- While entering new password, Password Strength Indicator is activated and changed accordingly (Text changes and Horizontal line percentage color changes).
- When Next button on keyboard clicked:
- If empty, error message will be shown.
- If entered but Password Strength is Invalid, Very Weak, Weak or Reasonable, error message will be shown.
- If entered and Password Strength is Strong or Very Strong, Confirm Password field gains the focus.
Confirm Password Validation
- While entering Confirm Password its value is secured (*******).
- When Confirm Password field is in focus, Done button on keyboard is shown.
- When Done pressed:
-
- a. Both, New Password field and Confirm Password field contain same value, Communicator Go starts (section 4.).
- b. New Password field and Confirm Password field does not contain same value, appropriate error message is shown.
Communicator Go start
There are 3 cases that can happen when Communicator Go starts:
- App is installed, then ran, user logs in.
- User Sign Out from app, then started it again, logs in.
- App is normally ran.
In first case, when Communicator Go starts, Left and Right Menu will be shown briefly and accordingly. Most of the screens in the application has Left Menu and can have Right Menu. These are accessible by two ways:
- Through Navigation Bar, Left Menu by pressing far left option
 and Right Menu by pressing far right option
- Swipe Action from Left Edge of the device screen for Left Menu and from Right Edge of the device screen for Right Menu.
According to Settings-> General, under Application Display Settings option Communicator Go is Initial View, when Communicator Go is started, Phone Screen (section 5., image 4) or Communicator Go Screen (section 6., image 5) is shown.
Below Navigation Bar, alert bar will display detail error messages in case of eventual issues.
Left Menu

Left Menu contains three parts:
- Menu Bar
- App Icon
- App Name
- Close Menu Button
- User’s Details
- Avatar
- Name
- Extension
- Indicator to open User’s Profile Screen
- Menu Items with Icon and Title
- Phone (chapter )
- Communicator Go Contacts (chapter )
- Contacts (chapter )
- Voicemail (chapter )
- Settings (chapter )
- Log out (chapter )
There are two ways to close Left Menu:
- Press Close button
- Swipe from Right to Left
Depending from which screen left menu is opened, that screens corresponding menu item is selected. When opened, on the right side of the left menu screen, screen from which menu is opened should be partially visible and dimmed.
Right Menu (general)

In general, Right Menu is similar to Left Menu. Difference is that its contents depends from which screen it is opened.
This menu contains two parts:
- Menu Bar
- Close Button
- Screen’s name and icon
- Menu Items
- List of actions that can be performed for the screen from which Right Menu is opened.
There are two ways to close Right Menu:
- Press Close button
- Swipe from Left to Right
When opened, on the Left Side of Right Menu Screen, screen from which menu is opened should be partially visible and dimmed.
Phone
This screen is shown:
- When app is started, if in Settings -> General, under “Application Display Settings”, option “Communicator Go is Initial View” is turn off.In Left Menu, when Phone item is pressed.
- Returning from Call Screen (which was presented from Phone Screen) after call is finished.
- In Header Bar, central item
 is pressed.
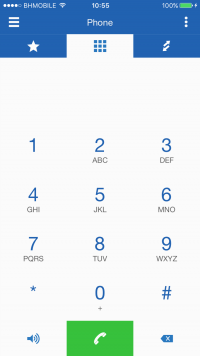
Phone Screen contains, beside app’s Navigation Bar and Alert Bar, these parts:
- Header Bar
- Favorites Tab
- Dialer Tab
- Recents Tab
- Dialer
- Number Display
- Number Dialer
- Footer Bar
- Speaker Toggle Button
- Call Button
- Delete Button
These are some states and actions that can occur/be perform on Phone Screen:
- Dialing numbers on the Number Dialer, numbers should be displayed on Number Display and sound for pressed number should be played.
- Long tap on “0” should dial “+”.
- Long tap on Delete Button should delete entire number sequence entered
- Long tap on Number Display will display “Copy” and “Paste” options.
- Pressing Speaker Toggle Button turns ON/OFF speaker. When speaker is ON, speaker icon is shown in color red.
- After some sequence of numbers has been entered, Call Button makes call. More details in section 5.1.
- When there is no entry in Number Display, pressing Call Button will show last called number and pressing Call Button again will redial that number.
- Call Button states:
-
- a. Green – if call can be made over SIP protocol (WiFi and Mobile Data Networks)
- b. Orange – if call can be made over Callback module (Mobile Data Networks)
- c. Gray – calls can not be made (No Network Connections)
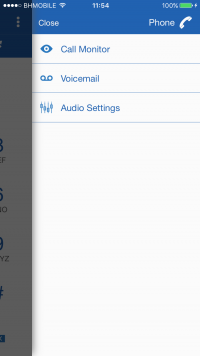
Phone Screen’s Right Menu
This Menu is opened when:
- User presses Right Menu in Favorites Screen.
- Swipes from Right Edge of Phone Screen.
When this Menu is shown:
- Phone icon and “Phone” text is displayed on far right of menu bar.
- Menu Items are:
-
- a. Call Monitor
- i. Will perform action only if there is entered number in Number Display
- ii. Will make call to monitor a called extension and only extensions can be monitored.
- b. Voicemail
- i. Will perform action only if there is entered number in Number Display
- ii. Will send voicemail to entered number.
- c. Audio Settings
- a. Call Monitor
Will display Audio Screen to setup Volume and Microphone input gain of Speaker, ear piece, headset, bluetooth…
Making Calls
When devices Internet Connection:
- is over WiFi – app is connected to SIP server, so all calls will be made over SIP protocol
- is over Mobile (Cellular) Data:
-
- a. app is connected to SIP server if in Settings -> General, under “SIP”, option “SIP over mobile internet” is enabled.
- b. app is not connected to SIP server if in Settings -> General, under “SIP”, option “SIP over mobile internet” is disabled. This means, is app has module “Callback”, calls will be made over Callback option, otherwise calls can not be made.
- is offline – no internet connection, calls can not be made.
Calls made over SIP protocol will be shown in Call Screen, section 7.
Favorites
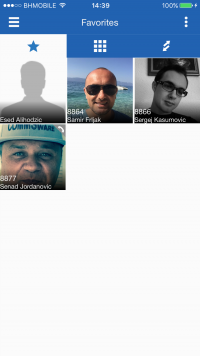
This screen appears when user clicks Favorites Tab from Header Bar in Phone Screen.
When this screen is shown, if there is no favorites, “No Favorites” label should be displayed in the middle of the screen. By default, favorites are displayed in Grid mode, all types are shown, sorted ascending by name.
Clicking on the favorite:
- If it is Communicator Go contact (extension), Communicator Go Contact (Extension) Screen will be shown (chapter ).
- If it is device’s contact (contact from device’s Call app), Contact’s Screen will be shown (chapter ).
Image 8. – Favorites Screen
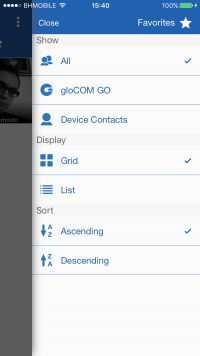
Favorites Right Menu
This Menu appears if:
- User presses right menu in Favorites Screen
- Swipes from right edge of Favorites Screen.

When this Menu is shown:
- In Menu bar, on the far right is Favorites icon and “Favorites” text is displayed.
- Menu Items are:
-
- a. Show
- i. All – shows all contacts.
- ii. Communicator Go – shows Communicator Go (Extensions) contacts
- iii. Device Contacts – shows Contact’s from device’s Call app.
- b. Display
- i. Grid – Displays contacts in grid mode.
- i. List displays contacts in list mode.
- c. Sort
- i. Ascending – Displays contacts in alphanumerical ascending order by name.
- ii. Descending – Displays contacts in alphanumerical descending order by name.
- a. Show
Options under “Show” are exclusive and only one at the time is selected. By default “All” option is selected.
Options under “Display” are exclusive and only one at the time is selected. By default “Grid” option is selected.
Options under “Sort” are exclusive and only one at the time is selected. By default “Ascending” option is selected.
Recents
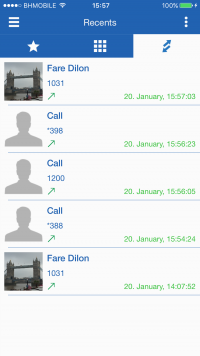
This screens appears when:
- User presses Recents Tab from Header Bar in Phone Screen
- There are missed calls, on app starting/opening, Recent Screen will be shown with the list of the missed recent calls.
When this screen is shown, if there is no recents, “No Recents” label should be displayed in the middle of the screen.
Recents are displayed only in List mode (no Grid mode), all types are shown, sorted descending by the date.
Clicking on the recent:
- if type of extension, will display Extension Screen.
- if type of device’s contact, will display Contact Screen.
- non of above, will call number immediately.
Recents Right Menu
This Menu appears when:
- User presses Right Menu in Favorites Screen
- Swipes from Right Edge of Favorites Screen.
When this Menu is shown:
- In Menu Bar, far Right is Recents icon and “Recents” text displayed.
- Menu Items are:
-
- a. Show
- i. All – shows all recents calls.
- ii. Missed – shows missed calls.
- iii. Dialed – shows dialled calls.
- iv. Received – shows received calls.
- b. Sort by Date
- i. Ascending – Displays recents calls by date ascending.
- ii. Descending – Displays recents calls by date descending.
- c. Actions
- i. Clear Log – Deletes all recents from device’s cache.
- a. Show
Options under “Show” are exclusive and only one at the time is selected. By default “All” option is selected.
Options under “Sort by Date” are exclusive and only one at the time is selected. By default “Descending” option is selected.
Extensions Screen

This screen appears:
- When app is starting, if in Settings -> General, under “Application Display Settings”, option “Communicator Go is Initial View” is enabled.
- When user, in Left Menu, presses Communicator Go menu item
- Returning from Call Screen (which was presented from Extension Screen) after call is finished.
When this screen is shown:
- If there are no extensions, “No Extensions” label should be displayed.
- Extensions are displayed in grid mode.
- Every extension should display:
- Avatar image, if there is one or default avatar (black shadow of the person with the white background)
- Extension number and name at the bottom of extension cell
- Phone status in top right corner (for busy and offline status, nothing for online status)
- In Navigation Bar, search field is displayed.
Pressing on extension will open Extension screen.
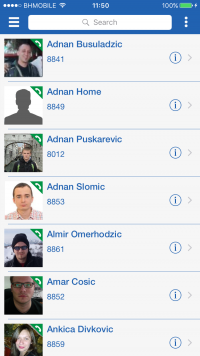
Extensions Search Screen
This screen appears when:
- Pressing on Search field in Extensions Screen.
When this screen is shown:
- search field is resized so Cancel button is inserted on the right side of Search field, left to the Right Menu icon,
- keyboard is activated with Search Button.
Image 14. – Extension Screen when search is activated – Extension Search Screen
Entering search term will list all extensions containing that term in extension name or number. So search can be done by name or number. Pressing on extension in search result will open Extension Screen.
Extensions Screen Right Menu
This screen appears when:
- user press right menu button in far right corner of Navigation Bar on Extensions Screen,
- user swipes from right edge to left on Extensions Screen.
When this menu is shown:
- in Menu Bar:
- on the left, “Close” button is shown.
- on the right, “Communicator Go” Label and icon are shown.
- menu items are:
- Departments
- All – pressing on this will display a list of departments, details in 6.2.1
- Phone Status
- All – shows all extensions, selected by default
- Online – shows extensions that are online
- Offline – shows extensions that are offline
- Display
- Grid – displays extensions in grid mode (image 12.)
- List – displays extensions in list mode (image 13.).
- Sort
- Ascending – sorts extensions by name in ascending order.
- Descending – sorts extensions by name in descending order.
- Departments
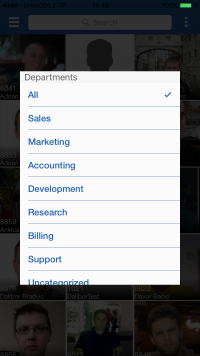
‘Extensions’ Departments
When this screen appears:
- User pressed option under “Department” in Right Menu of the Extensions Screen.
When shown:
- Background is dimmed
- Current department is selected, by default All.
- List is scrollable if there is more options than space to show them all.
Selecting one of the options (departments) will show all extensions from that department. If Extensions Screen is in the list mode, it will show selected department’s name at the top of the list, except for “All” option.
Image 16 – Departments Screen
Call
In Communicator Go, calls are made:
- over SIP protocol
- using Callback module in pwproxy
Scenarios may vary, depending on:
- network connection (WiFi, Mobile Data, No Connection)
- service availability and connections (SIP Server, Callback Module)
- setup in settings for “SIP over mobile internet”
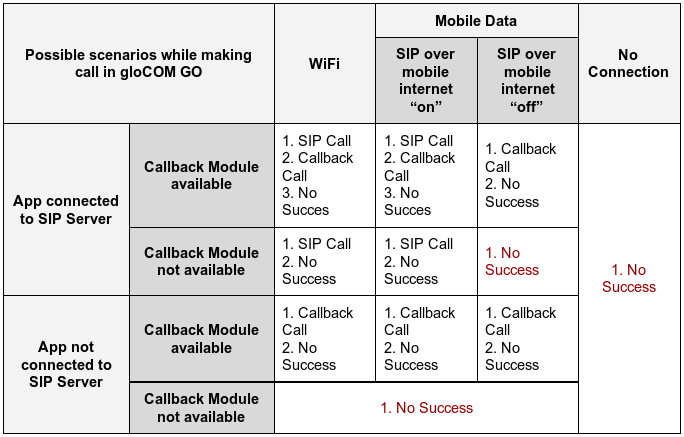
Lists in cell represent orders by which, so specific case, Communicator Go will make (try) call.
So, example, for cell 00:
- SIP Call
- Callback Call
- No Success
This means that when WiFi is available, app is connected to SIP Server and Callback Module is available on user’s PWProxy Server (PBXWare), Communicator Go will first try to make SIP Call; if unsuccessful, then app will try to make Callback Call; if unsuccessful then appropriate message will be displayed that call was not made.
SIP Call
SIP Call Screen appears when:
- user enters number sequence in Phone Screen’s Number Display and presses Call Button.
- user press “Call <extension_number>” from Communicator Go Contact (Extension) Screen
- user press contact number from Device Contact Screen
- user presses contact from Recents Screen that is not extension nor Device Contact.
- on incoming call to Communicator Go app
-

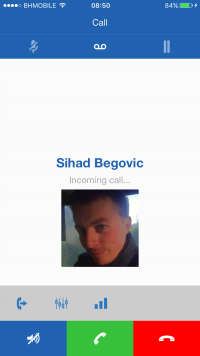
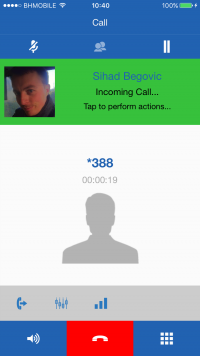
Incoming Call
-
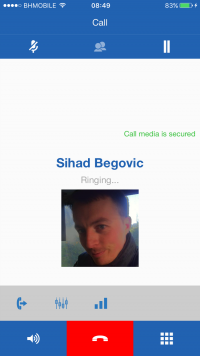
Outgoing Call

There is a difference between Call Screen when Outgoing Call is in progress and Call Screen when Incoming Call is in progress and these are:
- Header Bar Items
-
- a.Outgoing Call
- i. Mute Mic – enabled – toggle microphone mute on/off
- ii. Add another contact(s) to call (conference) – disabled – Add one or more contacts in to outgoing call, making dynamic conference; this functionality is not available in gloCOM 1.0
- iii. Put Call on Hold – enabled – toggle call hold state on/off
- b. Incoming Call
- i. Mute Mic – disabled – toggle microphone mute on/off
- ii. Send to Voicemail – enabled – sends incoming call to voicemail
- iii. Put Call on Hold – disabled – toggle call hold state on/off
- a.Outgoing Call
- Footer Bar:
-
- a. Outgoing Call
- i. Speaker – enabled – toggle speaker on/off
- ii. Cancel Call – enabled- cancels outgoing call
- iii. Dial Pad – enabled – shows dial pad for entering DTMF digits
- b. Incoming Call
- i. Snooze – enabled – toggle snooze on/off of call’s ringtone sound
- ii. Answer Call – enabled – answers incoming call
- iii. Decline Call – enabled – declines incoming call
- a. Outgoing Call
- Call Status Message – shows call statuses like
-
- a. Outgoing Call
- i. Calling – call request is sent to server
- ii. Ringing – call starts to ring on other side (callee’s side)
- iii. Connecting – callee accepts call
- iv. Call duration time – call in progress
- v. Call on Hold – one of the participants in call has put a call on hold
- b. Incoming Call
- i. Incoming Call – request for call to be made with user is presented
- ii. Connecting – user accepts incoming call
- iii. Call duration time – call in progress
- iv. Call on Hold – one of the participants in call has put a call on hold
- a. Outgoing Call
Other parts of the Call Screen are:
- Avatar image – if there is one it is shown, if not then default image of the person with black shadow and white background is shown.
- Callee’s Name (number) – if there is callee’s name available it is show, otherwise, callee’s number is shown.
- Call security – if call is made over TLS transport and SRTP protocol, message “Call media is secured.” is shown.
- Call Bar – contains actions that can be performed during the call.
-
- a. Call Transfer – shows Call Transfer Screen
- b. Audio Settings – shows Call Audio (Volume) Screen
- c. Call Statistics – shows Call Statistics Screen
Cal
l Screen does not have Left nor Right Menu and is dismissed (closed) when:
- user dismiss (ends) outgoing call
- user decline incoming call
- callee ends call
- user transfers call
- network connection changes
- SIP Server disconnects call
Also, there is special case, when there is SIP Call in progress in Communicator Go app, if there is incoming call (GSM Call) for device (iPhone, iPad) in device’s default Phone application, that GSM Call take priority over SIP call.
In this case, all SIP calls that are in progress are put on hold, until GSM Call interruption is ended.
This is default for all iOS devices. As it is stated in Apple’s official documentation on this link:
Providing Guidelines to the User
“There is no programmatic way to ensure that an audio session is never interrupted. The reason is that iOS always gives priority to the phone. iOS also gives high priority to certain alarms and alerts”
Multiple SIP Calls
-
Second incoming Call
-


Outgoing SIP Call
-
-
-
- Call screen with multiple calls in progress
-
-
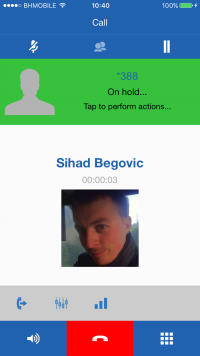
Communicator Go offers an option to handle two calls at the same time.
This means, if there is one SIP call in progress and you receive another incoming call, it will be presented to user on the SIP Call Screen.
One of the scenarios for this would be something like:
- There is already SIP Call in progress
- Another Incoming SIP Call is presented
- Tapping on Second Call brings it in focus. In this state, all actions from Header Bar and Footer Bar are enabled same as for normal Incoming Call
- Second Call is answered, image 18.a. In this state, all actions for normal SIP Call are available. First Call is put on hold and to interact with it (bring it to focus), has to be tapped, as the message says on image 18.a “Tap to perform actions…”
- When First Call is in focus again, it state is on hols, as it is shown on Call Status Message in image 18.b and Hold Button is red. To come back to that call user has to tap Hold Button and doing so will put Second Call on hold as it will re-invite First Call.
gloCOM would exit from Multiple SIP Calls state because one of the calls ends then normal SIP Call Screen would be presented.
-
Second call connected
-
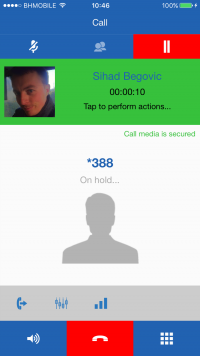
First call in focus and On Hold
-
-
-
- SIP call screen – Toggling between the calls
-
-
Transfer SIP Call
Transfer SIP Call Screen
Transfer SIP Call Screen appears when user presses Transfer Call Button on SIP Call Screen.
Transfer SIP Call Screen presents three options to transfer call to (Image 19.):
- To all my devices
- To contact…
- Enter number…
Transfer Call “To all my devices”
When user taps option “To all my devices”, current call will be transferred to the user’s all devices on which user has gloCOM app installed and registered same extension as on the Communicator Go.
Also, this means user will also have incoming call on his device from which this transfer is initialized. If there is gloCOM Desktop version on which user’s extension is registered, there will be Incoming Call. Also, any other iOS or Android devices with user’s extension registered, will have Incoming Call pending.
‘Transfer Call “To contact…” ‘
When user taps on option “To contact…” from Transfer Call Screen, Transfer Call Contacts Screen will be presented.
On Transfer Call to Contact Screen there are three parts:
- Navigation Bar
-
- a. “Back” Button
- b. Search Bar
- Header Bar
-
- a. Favorites Tab
- b. Extensions Tab
- c. Contacts Tab
- Contacts List
Depending which tab is selected in Header Bar, in Contacts List, that type of contacts will be shown. Default, list of extensions are shown.
Also, if Contact has two or more numbers, an arrow will be shown (image 20.b – Contact No 3.). When tapped on that contact, Contact’s List of Numbers Screen will be displayed with list of all numbers for that contact, image 21. When this screen is presented, background is dimmed, on top of the list, contact name is displayed.
Transfer Call “Enter number…”
When user taps on option “Enter number…” from Transfer Call Screen image 19., Enter Number Prompt View will appear, image 24.
There are two types of number user can enter here: extension or landline number.
Message “For landline numbers outside your SIM country, enter number in format {CountryCode}{AreaCode}{Number}” means, that if user is trying to transfer call to a SIM phone number outside user’s country, country code and area code of the number have to be included also.
Tapping “Cancel”, prompt disappears, cancelling that option for transfer.
Tapping “Transfer”, if everything ok, number is in good format, call is transferred, prompt disappears, Transfer Call Screen is dismissed, Call Screen is dismissed.
In case of Multiple SIP Calls, active call, call that is being transferred, dismisses and other call, that was On Hold, goes in focus.
Image 24. – Enter Number Prompt View
SIP Call Audio
SIP Call Audio Settings Screen will appear if user taps Audio Settings Button from Call Bar in Call Screen on image 16.
When presented, SIP Call Audio Settings Screen (image 23.) displays two slider, for Output Gain (Speaker, Ear Piece, Bluetooth, Headphones, …) and Input Gain (Microphone of iOS Device, Bluetooth, …). Background of this screen is dimmed.
Default values are taken from iOS Device’s values for output and input.
Range of slider goes from 0.0 (mute) to 2.0 (gain is increased by 200% of the device’s gain).
Image 23. – SIP Call Audio Settings Screen
SIP Call Statistics
SIP Call Statistics Screen is presented when user taps Call Statistics Button from Call Bar on.
SIP Call Statistics Screen displays List of statistics for current SIP Call.
They can vary, depending on many things, like if call is made over secure media transport and similar. Common options are:
- Callee – end participant in call
- Call Time – duration of the call
- Codec – which audio codec is used for call media
- SRTP Status – call is made over secure media transport
- RX Package Loss – received packages loss for call in percentages
- RX Jitter – received jitter for call in milliseconds
- TX Package Loss – sent packages loss for call in percentages
- TX Jitter – sent jitter for call in milliseconds
Image 24. – SIP Call Statistics Screen
Contacts
Contacts screen appears when user taps “Contacts” menu item from Left Menu.
Screen contains three parts:
- 1. Navigation Bar
- a. Left Menu button
- b. Search Bar
- c. Right Menu button
- 2. Contacts List
- 3. Index List
When app is first time installed, user has to grant access to Communicator Go app for device’s Address Book in order to access contacts.
When screen appears, if there are no contacts, or if user have not grant access for device’s Address Book contacts, then there would be shown label with “No Contacts”.
By default, contacts are ordered ascending by name and surnames are bolded.
Tapping on search bar, activates search of contacts. Search can be done by name, surname, number, email, company.
Index list contains all letters from English alphabet and # for contact which identificator starts with non letter character. Tapping on a letter from Index list on the left, will scroll contacts list to the section with the letter tapped.
Tapping on the contact from the list will display a Contact Screen with the details of the selected contact.
Contacts Screen’s Right Menu
This menu (image 25.b) appears:
- user taps Right Menu item from Contacts Screen,
- user swipes from right edge of the Contacts Screen to left.
When this menu is shown:
- in Menu Bar:
- on the left, “Close” button is shown.
- on the right, “Contacts” Label and icon are shown.
- menu items are:
- Sort
- Ascending – sorts contacts by name if sort order is “First, Last”, surname if sort order is “Last, First” in ascending order.
- Descending – sorts contacts by name if sort order is “First, Last”, surname if sort order is “Last, First” in descending order.
- Sort Order
- First, Last – will sort by name,
- Last, First – will sort by surname.
- Display Order
- First, Last – displays name then surname,
- Last, First – displays surname then name.
- Sort
All options from Right Menu mimicates iOS options from Phone App on IOS devices.
Image 25. – a) Contacts Screen
Contact Screen
This screen is presented when:
- user taps contact in contacts list on Contacts Screen
- user taps contact in favorites list on Favorites Screen
- user taps contact in recents list on Recents Screen
When this screen is presented, it shows contact’s details like image, name surname, company, list of phone numbers, list of emails and Add to/Remove from
Favorites button.
If contacts is added to Favorites list, “Remove from Favorites” button will be shown, else “Add to Favorites” will be shown.
In navigation Bar “Back” button is displayed.
Contact’s Number Country Select Screen
This screen (image 26.b) appears when user taps on the “Info” Button in Contact Screen (image 26.a).
On this screen user can select a country from which SIM phone number is. This information is then used when making a call, if E.164 number formatting is on, for better number formatting.
E.164 Number Formatting can be set in Settings -> General, under “Other”, option “Enable E.164 Number Formatting”, and is more explained in section.
If there is already country selected for the given phone number, then that country should be selected on the screen when it is openned.
Image 26. – a) Contact Screen
b) Contact’s Number Country Select Screen
Voicemail
Communicator Go supports listening and making voicemails and all related actions. On iOS devices, all voicemails have to be in .wav format, because it is only format supported.
To have this, in Settings of pwproxy server, voicemail format has to be set to “wav”.
Voicemails Screen (image 27.) is presented when user taps on Voicemail menu item in Left Menu.
This screen contains two parts:
- 1. Navigation Bar
- a. Left Menu
- b. Voicemail toggle button (Old/New)
- 2. List of voicemails
By default, list is list of new voicemails and it is indicated by header of the list where it is written “List of NEW voicemails”. Also, in right corner of Navigation Bar, Voicemail Toggle Buttons displays “Old” text.
When “Old” button is tapped, list will show old voicemails with header displaying message “List of OLD voicemails” and Voicemail Toggle Button displaying “New” text. If there is no voicemails, “No Voicemails” label should be displayed.
Image 27. – Voicemails Screen
When taped on “Info” Button, Voicemail Screen (image 28.) will be presented. Else, if tapped on voicemail directly, Voicemail Actions Screen (image 29.) is displayed.
Voicemail Screen
Voicemail screen is presented:
- when user taps on “Info” Button in Voicemails Screen (image 27.)
- when “Play” action is tapped in Voicemail Action Screen (image 29.)
Image 28. – Voicemail Screen
Voicemail Screen contains four parts:
- Navigation Bar
-
- a. Back Button
- Header Bar
-
- a. Time Play Pass Indicator
- b. Progress Bar
- c. Time Play Left Indicator
- Main View
-
- a. Avatar of the voicemail sender, if any, else, default image of person with black shadow and white background
- b. Name of the voicemail sender, number and date
- Footer Bar
-
- a. Stop – stops playing and resets to the start voicemail
- b. Play/Pause – plays and pauses voicemail
- c. Toggle Speaker – On/Off speaker
When this screen is presented by tapping “Info” Button on Voicemails Screen, voicemail is in not playing state.
When presented by directly tapping on voicemail in Voicemails Screen, voicemail is in playing state, which means:
- “Pause” button is shown,
- speaker is on with red color,
- time indicators are active,
- progress bar is active and showing progress of voicemail that is playing with red color.
After voicemail playing finishes, Voicemail Actions Screen is shown.
Voicemail Actions Screen
This screen is shown:
- when user taps directly on voicemail in Voicemails Screen (image 27.)
- when voicemail finishes playing.
This screen displays:
- voicemail sender details (name, number)
- actions:
- Play – displays Voicemail Screen and plays voicemail instantly.
- Move to Old/New – moves voicemail to old (listened) or new (not listened) folder.
- Delete – deletes voicemail from device and server (voicemail will not be accessible ever again).
- Call – call a sender’s number
- Voicemail – live a voicemail to a sender
- More call options, if sender has more numbers that can be called.
When voicemail moved to Old folder (marked as listened), voicemail badge from Left menu decreases by one, or if zero disappears.
If voicemail is already in Old folder, action “Move to New” will be displayed.
Depending, if sender is extension, then actions: Call, Voicemail and more call actions will be available.
When this screen is displayed, background is dimmed.